Configure an Agent: Model, System Prompt, Tools, and Memory
Choose the Agent's model and tools and learn how the Agent component works.
About This Task
Configure the agent prompt and model and expand its capabilities by adding tools it can use. You can also add memory to the Agent through Mem0.
You can add MCP servers, pipelines, custom code, and Mem0 Memory as tools. Make sure the tool's name and description are meaningful and help the Agent decide when to use the tool. Add instructions on how to use the tool in the Agent's prompt.
Prerequisites
- For an explanation of the Agent, its tools and memory, see AI Agent and Agent Tools.
- For the
Agentcomponent reference and parameter documentation, see Agent. - Make sure Haystack Platform is connected to the provider of the model you want to use. The Agent works with chat models that support tool calls. For details on how to connect, see Using Hosted Models and External Services.
- To use custom model definitions, make sure they're added on the Integrations page in Settings. For details, see Add Custom Model Definitions.
- For instructions on how to write prompts, see Writing Prompts in Haystack Platform.
- Understanding of pipelines and components in Haystack Platform. For details, see Pipelines and Pipeline Components.
Configure the Agent
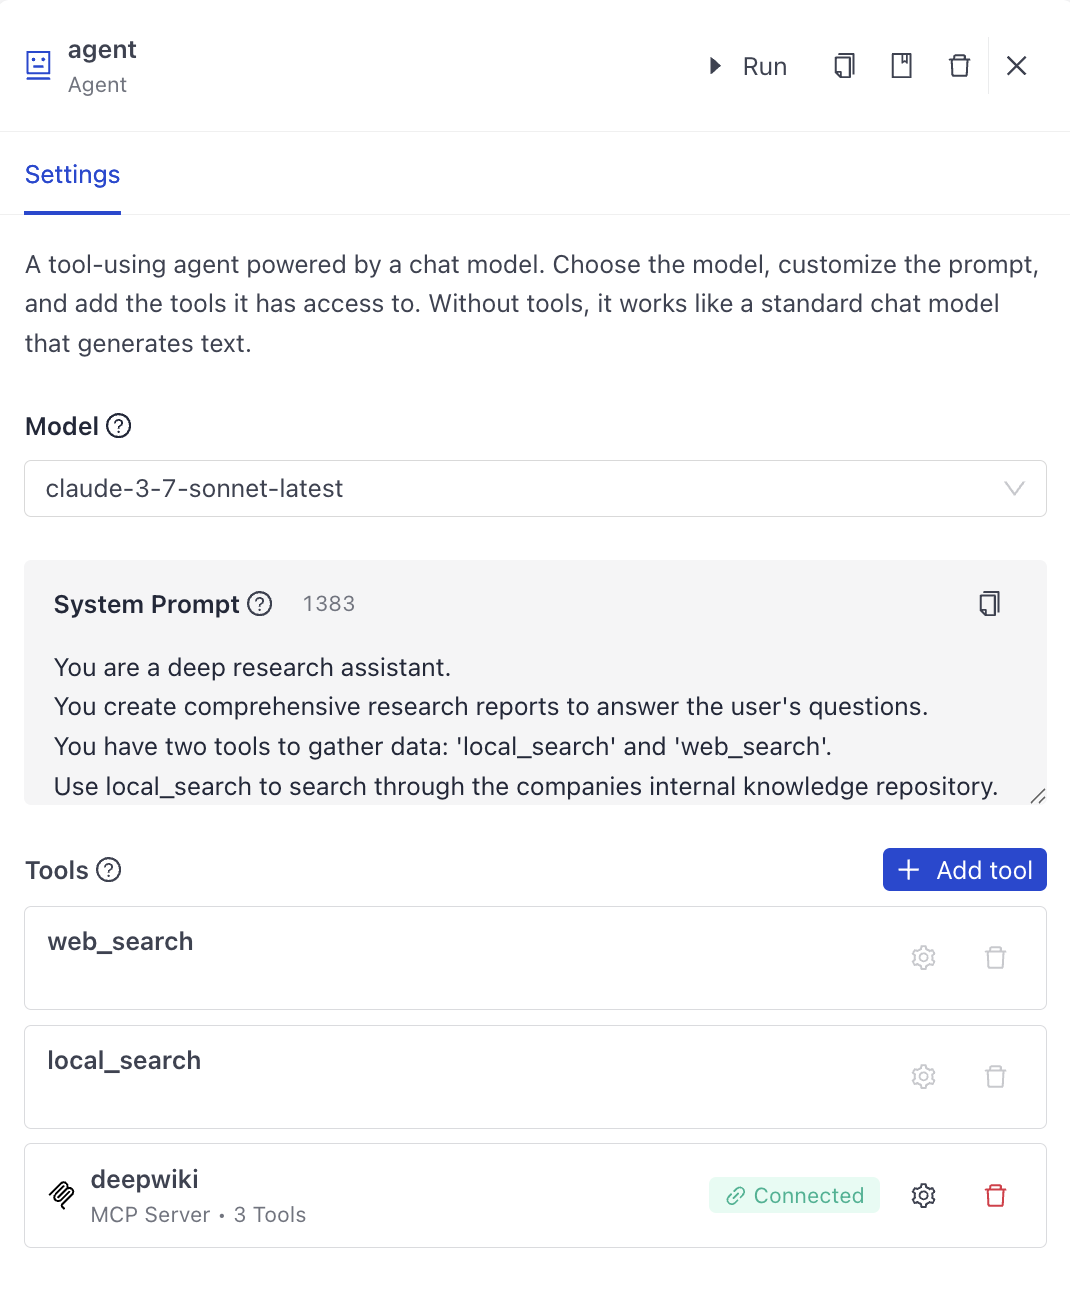
Configure the Model and System Prompt
- Click Add to open the component library and add the Agent component onto the canvas.
- Click the
Modelfield to open the Agent configuration panel and choose the model from the list. - Enter the system prompt for the Agent.
Add an MCP Server as a Tool
The server must be a remote server. To use a local server, first deploy it to a remote server.
- In the Tools section of the Agent configuration panel, click Add Tool.
- Choose MCP Server.
- Choose the transport protocol supported by the MCP Server you want to connect to. You'll find this information in the MCP Server documentation.
- Choose Server-Sent Events (SSE) to keep an open connection and receive real-time updates as they occur.
- Choose Streamable HTTP to receive updates in chunks as they become available.
- Give your server a name to help you identify it later.
- Enter the server URL.
- Optionally, enter an authentication token if the server requires one.
MCP API Key
If you enter the MCP API key when adding the tool, it's automatically added as a workspace secret with the MCP server name.
- Click Connect. The MCP server details open.

- Set the tool call timeout. This is the maximum time in seconds the Agent will wait for a response from the MCP server.
- From the list of available MCP tools, choose the tools you want to expose to the Agent.
You can run MCP tools on their own from the agent component card. Click Manage Tool next to the MCP server and choose the tool to run. Use this to debug or test tools without running the whole agent. For details, see Run Components and Pipelines in Builder
Example Configuration
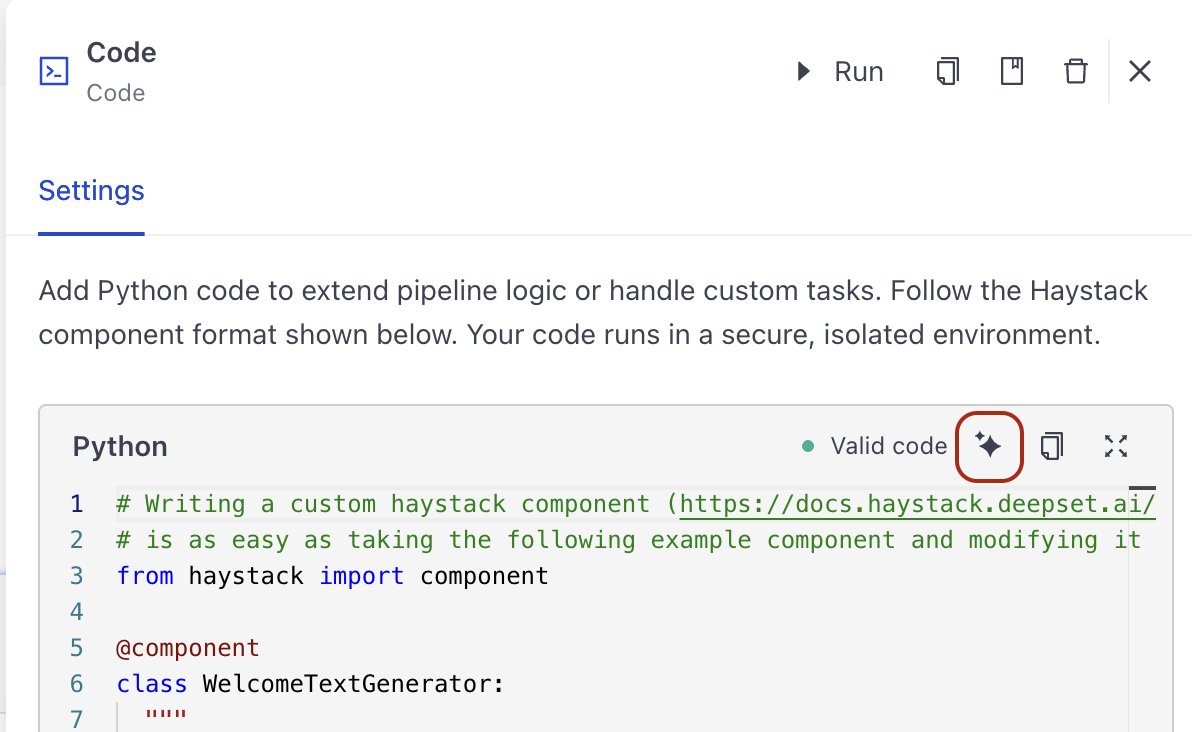
Add Custom Code as a Tool
You can add custom Python functions as tools to your Agent. The code must use the @tool decorator that automatically converts your function into a tool. Each tool must have a name, description, and parameters.
For detailed explanation of custom code as tools, see Agent Tools.
- In the Tools section of the Agent configuration panel, click Add Tool.
- Choose Code as the tool type.
- Give the tool a name and type a description for it, then click Create Tool. This opens the code editor.
- Enter the Python code for your tool function. The code must use the
@tooldecorator and must define a function that the Agent can call. Use Python'styping.Annotatedto add descriptions to parameters. This helps the Agent understand what each parameter does. You can use the example code as a starting point. Your code is immediately validated so you can easily debug it before deploying the Agent.
You can also use the AI assistant to generate code for your custom tool. To do this, click the AI Assistant button on the tool card, write your request in the prompt, and watch how the code gets generated.
- Add a tool name and description. Make sure the name is unique and descriptive. Make sure the description clearly explains what the tool does. The Agent uses the tool's name and description to decide when to use it.
You can run your custom tools on their own from the agent component card. In the Tools section, click the tool you want to run and then click Run.

Add a Pipeline as a Tool
You can add an existing pipeline or create one from a template. Such pipeline becomes detached from the original pipeline, so any changes you make to the original pipeline don't affect the tool pipeline. You can edit the pipeline tool directly from the Agent component card.
You can add a pipeline as a tool even if it has validation warnings, as long as the pipeline can be used. The tool is created and the warnings are visible in the Agent Settings so you can review and resolve them later. If the pipeline has errors that prevent it from being used, the tool cannot be created.
- In the Tools section of the Agent configuration panel, click Add Tool.
- Choose Pipeline as the tool type.
- In the Create Pipeline Tool window:
- Choose if you want to start from an existing pipeline or from a template.
- If you're starting from an existing pipeline, choose a pipeline from the list, and then choose the version you want to use.
- If you're starting from a template, choose the template to use.
- Enter a name and a description for the pipeline tool. Make sure they're meaningful as the agent uses them to decide when to use the tool.
- Click Add Pipeline Tool. The Agent configuration panel opens.
- Under Tools, click the pipeline you just added.
- Choose the pipeline inputs and outputs you want to expose to the Agent:
- Expand Pipeline Inputs.
- Choose how you want the pipeline to receive its inputs:
- Choose LLM for the agent to automatically generate the input and feed it to the pipeline.
- Choose State to read the input from the agent's state. Input stored in state is the input that earlier components or tools generated.
- Expand Pipeline Outputs and choose how to handle the pipeline's outputs:
- Choose LLM to feed the pipeline output to the agent. This is useful if the agent needs to use the pipeline output in its next turn.
- Choose State to store the pipeline output in the agent's state. This is useful if you want the output to be available to other tools or components in the pipeline.
- Choose Both to store the output in both the agent's state and feed it to the agent.
You can run pipeline tools on their own from the agent component card. In the Tools section, click the pipeline tool you want to run and then click Run.
Use this option to debug or test tools without running the whole agent. For details, see Run Components and Pipelines in Builder.
Add Mem0 Memory Tools
You can add memory to your Agent through Mem0. Mem0 Memory tools give your Agent long-term memory across conversations. Adding them creates two tools: one for storing memories (store_memory) and one for retrieving them (retrieve_memories). Both tools are scoped to individual users through a user_id that the platform injects automatically from the Agent's state.
For an explanation of how Mem0 Memory tools work, see Mem0 Memory.
You need a Mem0 API key to use Mem0 Memory tools. When you add the tools, the key is stored as a workspace secret. You can reuse an existing secret if you've already added a Mem0 API key to your workspace.
- In the Tools section of the Agent configuration panel, click Add Tool.
- Choose Mem0 Memory.
- In the API Key field, choose an existing Mem0 API key secret from the list, or type a new key to save it as a secret.
- Optionally, adjust the store memory tool settings:
- Tool name: The name the Agent uses to identify and call the store memory tool. Defaults to
store_memory. - Description: Explains to the Agent when to use this tool. Keep it clear and specific.
- Tool name: The name the Agent uses to identify and call the store memory tool. Defaults to
- Optionally, adjust the retrieve memories tool settings:
- Tool name: The name the Agent uses to identify and call the retrieve memories tool. Defaults to
retrieve_memories. - Description: Explains to the Agent when to use this tool. Keep it clear and specific.
- Top K: The maximum number of memories to return per retrieval call. Defaults to
5.
- Tool name: The name the Agent uses to identify and call the retrieve memories tool. Defaults to
- Click Add Mem0 Memory Tools.
The platform adds both tools to the Agent and automatically updates the Agent's state_schema to include a user_id field. This scopes each user's memories separately.
To change the tool settings after adding them, click Manage Tool next to the Mem0 Memory entry in the Tools section.
Tutorials
See these tutorials for end-to-end examples of configuring an agent with tools:
- Building a Deal Desk Agent with Search and Custom Code — Configure a pipeline search tool and a custom code tool on the same agent.
- Building an IT Helpdesk Agent with Multiple Knowledge Bases — Configure two pipeline search tools that route questions to different knowledge bases.
Was this page helpful?