Pipeline Components Overview
Components are the fundamental building blocks of your pipelines, dictating the flow of data. Each component performs a designated task on the data and then forwards the results to subsequent components.
How Components Work
Components receive predefined inputs within the pipeline, execute a specific function, and produce outputs. For example, a component may take files, convert them into embeddings, and pass these embeddings on to the next connected component. You have the flexibility to mix, match, and interchange components in your pipelines.
Components are often powered by language models, like LLMs or transformer models, to perform their tasks.
By default, components run on CPU. You can turn on GPU acceleration in the pipeline or index settings to speed up processing. For details, see GPU Acceleration.
Connecting Components: Inputs and Outputs
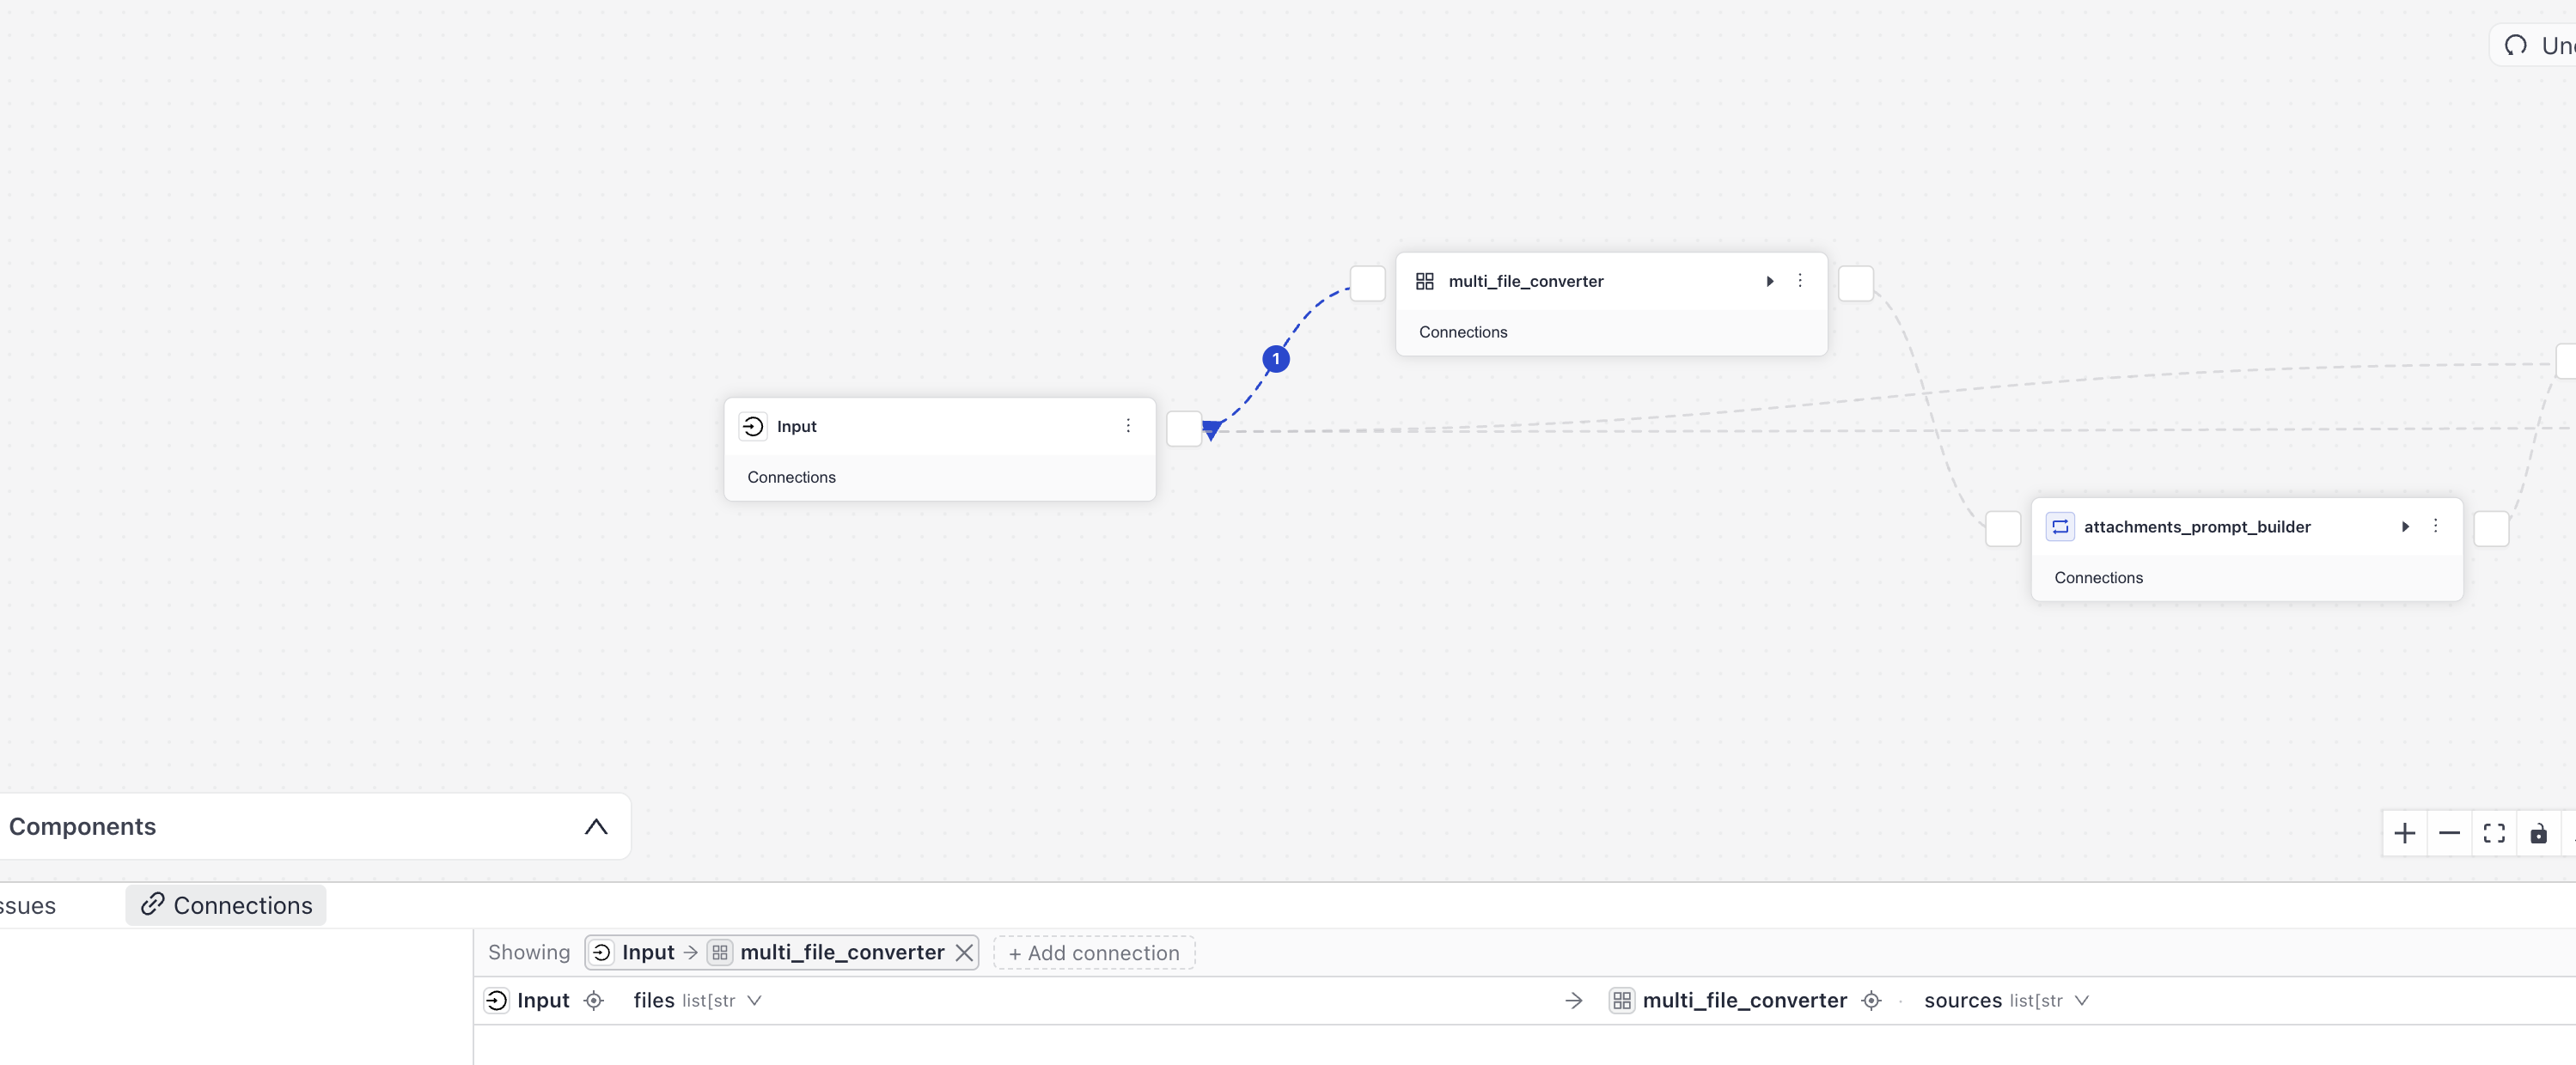
Components accept specific inputs and produce defined outputs. You can connect components with matching intputs and outputs types. The output type from one component must be compatible with the input type of the subsequent one. For example, a retriever outputs List[Document] and a ranker accepts List[Document] as input, their types match so you can connect them. Builder guides you through the connections with connection validation. You can also use the Connections panel at the bottom of the canvas to manage, inspect, and edit component connections.
To connect components, drag a line between them or use the Connections panel.
A component must always receive all of its required inputs. Components that accept lists as inputs can receive multiple outputs if they are of the same type. For example, you can connect multiple Converters that produce lists of documents to a DocumentWriter that accepts a list of documents as input. For details, see Smart Connections.
When working in YAML, you indicate their output and input names, for example:
# ...
connections:
- sender: retriever.documents
  receiver: ranker.documents
  # ...
The output of the sender component can have a different name than the input of the receiver component as long as their types match, as in this example:
# ...
connections:
- sender: file_type_router.text/plain
  receiver: text_converter.sources
  # ...
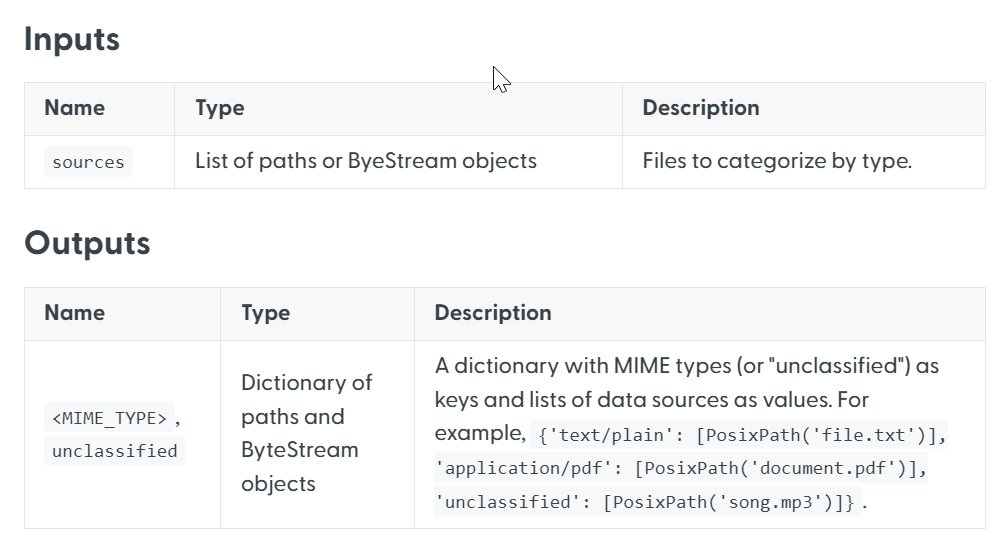
For detailed specifications on what inputs and outputs each component requires and generates, refer to the individual documentation pages for each component. The component's inputs and outputs are listed under Parameters:
Configuring Components
In Builder
In Builder, you simply add components to the canvas from the component library that opens when you click Add. You can then click the component to open its configuration panel and customize parameters. You can change the component name by clicking it and typing in a new name.
In YAML
The easiest way is to add the component to the canvas in Builder and then switch to the YAML editor to update the component's definition.
This is an example of how you can configure a component in the YAML:
components:
  my_component: # this is a custom name
    type: haystack.components.routers.file_type_router.FileTypeRouter # this is the component type you can find in component's documentation
    init_parameters: {} # this uses the default parameter values
Connecting Components
As components can have multiple outputs, you must explicitly indicate the component's output you want to send to another component. You configure how components connect in the connections section of the YAML, specifying the custom names of the components and the names of their output and input you want to connect, as in this example:
connections:
# we're connecting the text/plain output of the sender to the sources input of the receiver component
- sender: my_component.text/plain
  receiver: text_converter.sources
If a component accepts outputs from multiple components, you explicitly define each connection, as in this example:
connections:
- sender: embedding_retriever.documents
  receiver: joiner.documents
- sender: bm25_retriever.documents.
  receiver: joiner.documents
Component Types
Components are grouped by their function, for example, embedders, generators, and so on. Read about what the different types do to help you find appropriate components.
Embedders
Embedders convert text strings or Document objects into vector representations (embeddings). They use pre-trained models to do that.
Embeddings are vector representations of text that capture the context and meaning of words, rather than just relying on keywords. In LLM apps, they speed up processing and improve the model's ability to understand complex linguistic nuances and semantic understanding of text.
Text and Document Embedders
There are two types of embedders: text and document. Text embedders work with text strings and are most often used at the beginning of query pipelines to convert query text into vectors and send it to a retriever. Document embedders embed Document objects and are most often used in indexing pipelines, after converters, and before DocumentWriter.
You must use the same embedding model for text and documents. This means that if you use CohereDocumentEmbedder in your indexing pipeline, you must then use CohereTextEmbedder with the same model in your query pipeline.
LLM
LLM replaces the legacy Generators and ChatGenerators components. It lets you use large language models (LLMs) in your applications.
Generators and ChatGenerators
Using a ChatGenerator with a ChatPromptBuilder or a Generator with PromptBuilder is a legacy approach and will be deprecated in future releases. We recommend using the LLM component instead. It replaces both components and works with any LLM provider.
For details, see LLM.
- Generators are designed for text-generation tasks, such as in a retrieval augmented generation (RAG) system, where the user asks a question and receives a one-time answer. Most
Generatorshave a correspondingChatGenerator. - ChatGenerators handle multi-turn conversations, maintaining context and consistency throughout the interaction. They also support tool calling, which allows the model to make calls to external tools or functions.
Key Differences
| Generators | ChatGenerators | |
|---|---|---|
| Input type | String (supports Jinja2 syntax) | List of ChatMessage objects or string |
| Output type | Text | ChatMessage or string |
| Best for | • Single-turn text generation • RAG-style Q&A | • Multi-turn chat scenarios • Maintaining context across interactions • Assuming a consistent role • Tool calls • Using various content types, such as text and images, in prompts |
| Tool calling | Not supported | Supported (accepts tools and functions as parameters) |
| Used with | PromptBuilder | ChatPromptBuilder |
When to Use Each
- Use a ChatGenerator if:
- Your application involves multi-turn conversations.
- The model needs to call external tools or functions.
- You want to use various content types in the prompt, for example images and text.
- Use a Generator if the model only needs to generate answers without maintaining conversation history.
Streaming
Streaming refers to the process of generating responses in real time as the model processes input. Instead of waiting for the entire input to be processed before responding, the model generates an answer token by token, making the communication feel more fluid and immediate.
Streaming is particularly useful in applications where timely feedback is crucial, such as in live chat interfaces or conversational agents.
All RAG pipelines in Haystack Enterprise Platform have streaming enabled by default.
To learn more, see Enable Streaming.
Choosing a Generator
Each model provider or model-hosting platform supported by Haystack Platform has a dedicated Generator. Choose the one that works with the model provider you want to use. For example, to use the Claude model through Anthropic's API, choose AnthropicGenerator. To use models through Amazon Bedrock, choose AmazonBedrockGenerator.
For guidance on models, see Language Models in Haystack Enterprise Platform.
ChatMessage
ChatMessage is a data class used by, ChatGenerators and ChatPromptBuilder. ChatPromptBuilder sends a list of ChatMessages to a ChatGenerator, which then also returns a list of ChatMessages. LLM's prompt is a list of ChatMessages.
Each message has a role (such as system, user, assistant, or tool) and associated content. The system message is used to set the overall tone and instructions for the conversation, for example: "You are a helpful assistant." The user message is the input from the user, usually a query, but it can also include documents to pass to the model. During the interaction, the LLM generates the next message in the conversation, usually as an assistant.
For details on the message format and its properties, see ChatMessage in Haystack documentation.
When using ChatPromptBuilder always provide your instructions using the template parameter in the following format:
- content:
    - content_type:  # replace this with the content type, supported content types are: text, tool_call, tool_call_result
      # content may contain variables
  role: role # supported roles are: user, system, assistant, tool`
In most cases, you'll write your instructions using the text content type and roles such as user, system, assistant, or tool. For instance, you might include the model's instructions as a system role ChatMessage, and the user's input as a user role ChatMessage. The following example includes retrieved documents within the user message together with the query:
- _content:
    - text: |
        You are a helpful assistant answering the user's questions.
        If the answer is not in the documents, rely on the web_search tool to find information.
        Do not use your own knowledge.
  _role: system
- _content:
    - text: |
        Question: {{ query }}
  _role: user
If the LLM calls a tool, it outputs a message with the content type tool_call. You can use this content type to configure conditional pipeline paths. For example, you can create two routes with ConditionalRouter: one route for when the LLM makes a tool call, and another for when it doesn't.
Automatic Type Conversion
Connections between String and ChatMessage are automatically converted in both directions. This means you can connect a ChatGenerator to inputs that expect plain text, or pass a query directly to a ChatGenerator, without any extra conversion steps.
When a ChatGenerator receives a string input, it automatically converts it to a ChatMessage with the user role. When a ChatMessage output is connected to a string input, its text attribute is automatically extracted. If there is no text, the pipeline raises an error.
Jinja2 Syntax in ChatPromptBuilders
You can pass ChatMessages as Jinja2 strings in the template parameter of ChatPromptBuilder. This makes it possible to create structured ChatMessages with mixed content types, such as images and text. It also makes it possible to test the prompt in Prompt Explorer.
Use the {% message %} tag to include the ChatMessage in the prompt. For example:
{% message role="system" %}
You are a helpful assistant answering the user's questions.
If the answer is not in the documents, rely on the web_search tool to find information.
Do not use your own knowledge.
{% endmessage %}
For details, see ChatPromptBuilder and Writing Prompts in Haystack Enterprise Platform.
Generators in a Pipeline
- Generators receive the prompt from
PromptBuilderand return a list of strings. They can easily connect to any component that accepts a list of strings as input. - ChatGenerators receive prompts from
ChatPromptBuilderin the form of a list ofChatMessageobjects or templatized Jinja2 strings and they return a list ofChatMessageobjects.- If you want a ChatGenerator's output to be the final pipeline output, you can connect it directly to
AnswerBuilder. With smart connections, the pipeline convertsChatMessagetoStringautomatically, so you no longer need anOutputAdapterin most cases. For details, see Simplify Your Pipelines with Smart Connections.
- If you want a ChatGenerator's output to be the final pipeline output, you can connect it directly to
For details, see Common Component Combinations.
Limitations
ChatGenerators work in Prompt Explorer only if you use the Jinja2 syntax in their template parameter. If you use ChatMessages, you experiment with prompts using the Configurations feature in the Playground and modify the ChatPromptBuilder's template parameter. For details, see Modify Pipeline Parameters at Query Time.
Haystack Components
Haystack is Haystack Platform's open source Python framework for building production-ready AI-based systems. Haystack Enterprise Platform is based on Haystack and uses its components, pipelines, and methods under the hood. To learn more about Haystack, see the Haystack website.
Was this page helpful?