Tutorial: Build a PII Masking Index with Custom Code
Build an index that hides sensitive personal information using custom code. This tutorial is a great starting point if you're building an app where you need to keep sensitive data out of the LLM, such as a CV screening system. You'll also learn how ot use the Code component in your apps.
- Level: Beginner
- Time to complete: 10 minutes
- Prerequisites:
- You must have an Editor role in the workspace where you'll create the index.
- You must have a Haystack Platform workspace where you'll create the index. For instructions on how to create a workspace, see Quick Start Guide.
- Goal: After completing this tutorial, you'll have create an index that can process PDF and TXT files and masks sensitive personal information using custom code. You'll also learn how to use the
Codecomponent in your apps.
Create the Index
To keep it simple, let's create an index that can process PDF files.
- In Haystack Platform, make sure in the correct workspace and go to Indexes.
- Click Create Index>Build your own to create an index from scratch.

- Type PII-masking-index as the name and An index that masks sensitive personal information as the description and click Create Index.
- Click Components to open the component library and drag the following components onto the canvas:
You can use the search field in the Component Library to find components quickly.
InputPDFMinerToDocumentCodeDocumentSplitterDeepsetNvidiaDocumentEmbedderDocumentWriterOpenSearchDocumentStore
-
Click the
Codecomponent to open the code editor. You can expand it to make it more convenient.
-
Replace the example code with the following code:
from haystack import component, Document
import re
from typing import List

@component
class Code:
    """
    Masks personally identifiable information in CV text before LLM processing.
    """
    @component.output_types(cleaned_docs=List[Document])
    def run(self, documents: List[Document]) -> dict:
        cleaned_docs = []

        for doc in documents:
            redacted = doc.content

            # Email addresses
            email_pattern = r'\b[A-Za-z0-9._%+-]+@[A-Za-z0-9.-]+\.[A-Za-z]{2,}\b'
            redacted = re.sub(email_pattern, '[EMAIL]', redacted)

            # LinkedIn URLs
            linkedin_pattern = r'linkedin\.com/in/[A-Za-z0-9_-]+'
            redacted = re.sub(linkedin_pattern, '[LINKEDIN]', redacted, flags=re.IGNORECASE)

            # GitHub URLs
            github_pattern = r'github\.com/[A-Za-z0-9_-]+'
            redacted = re.sub(github_pattern, '[GITHUB]', redacted, flags=re.IGNORECASE)

            # Phone numbers: +44 7700 112233, 07700 112233, 798072811, etc.
            phone_pattern = r'(\+\d{1,3}[\s.-]?)?\(?\d{2,4}\)?[\s.-]?\d{3,4}[\s.-]?\d{3,4}|\b\d{9,11}\b'
            redacted = re.sub(phone_pattern, '[PHONE]', redacted)

            # UK postcodes: BS8 1AF, M1 4HE, EC1A 1BB
            postcode_pattern = r'\b[A-Z]{1,2}\d[A-Z\d]?\s?\d[A-Z]{2}\b'
            redacted = re.sub(postcode_pattern, '[POSTCODE]', redacted, flags=re.IGNORECASE)

            # Street addresses (line containing number + street type)
            street_pattern = r'\d+\s+[\w\s]+(?:Street|St|Road|Rd|Avenue|Ave|Lane|Ln|Drive|Dr|Way|Court|Ct|Place|Pl|Square|Sq|Close|Crescent|Terrace|Grove|Park|Gardens|Row|Mews|Hill|Green|Wood|Gate|Walk|Fields|Rise|View|Valley|Meadow|Heights)\b[^,\n]*'
            redacted = re.sub(street_pattern, '[ADDRESS]', redacted, flags=re.IGNORECASE)

            # Date of birth patterns: DOB: 15/03/1988, Date of Birth: 15 March 1988
            dob_pattern = r'(DOB|Date of Birth|Born|Birthday|D\.O\.B\.?)[\s:]*\d{1,2}[\s./-](\d{1,2}|Jan(?:uary)?|Feb(?:ruary)?|Mar(?:ch)?|Apr(?:il)?|May|Jun(?:e)?|Jul(?:y)?|Aug(?:ust)?|Sep(?:tember)?|Oct(?:ober)?|Nov(?:ember)?|Dec(?:ember)?)[\s./-]\d{2,4}'
            redacted = re.sub(dob_pattern, '[DATE_OF_BIRTH]', redacted, flags=re.IGNORECASE)

            # National Insurance Number (UK): AB 12 34 56 C
            nino_pattern = r'\b[A-Z]{2}\s?\d{2}\s?\d{2}\s?\d{2}\s?[A-Z]\b'
            redacted = re.sub(nino_pattern, '[NATIONAL_ID]', redacted, flags=re.IGNORECASE)

            cleaned_docs.append(Document(content=redacted, meta=doc.meta))

        return {"cleaned_docs": cleaned_docs}
Your code is instantly validated.
-
Close the code editor.
-
Connect the components as follows: Tip: Just drag lines between components to connect them. Builder will automatically create the connections for you, joining compatible outputs with compatible inputs.
- Connect
Input'sfileoutput toPDFMinerToDocument'ssourcesinput. - Connect
PDFMinerToDocument'sdocumentsoutput toCode'sdocumentsinput. - Connect
Code'scleaned_docsoutput toDocumentSplitter'sdocumentsinput. - Connect
DocumentSplitter'sdocumentsoutput toDeepsetNvidiaDocumentEmbedder'sdocumentsinput. - Connect
DeepsetNvidiaDocumentEmbedder'sembeddingsoutput toDocumentWriter'sdocumentsinput. - Connect
DocumentWriter'sdocumentsoutput toDocumentStore'sdocumentsinput. - Connect
DocumentStore'sdocument_storeinput toOpenSearchDocumentStore'sdocument_storeoutput.
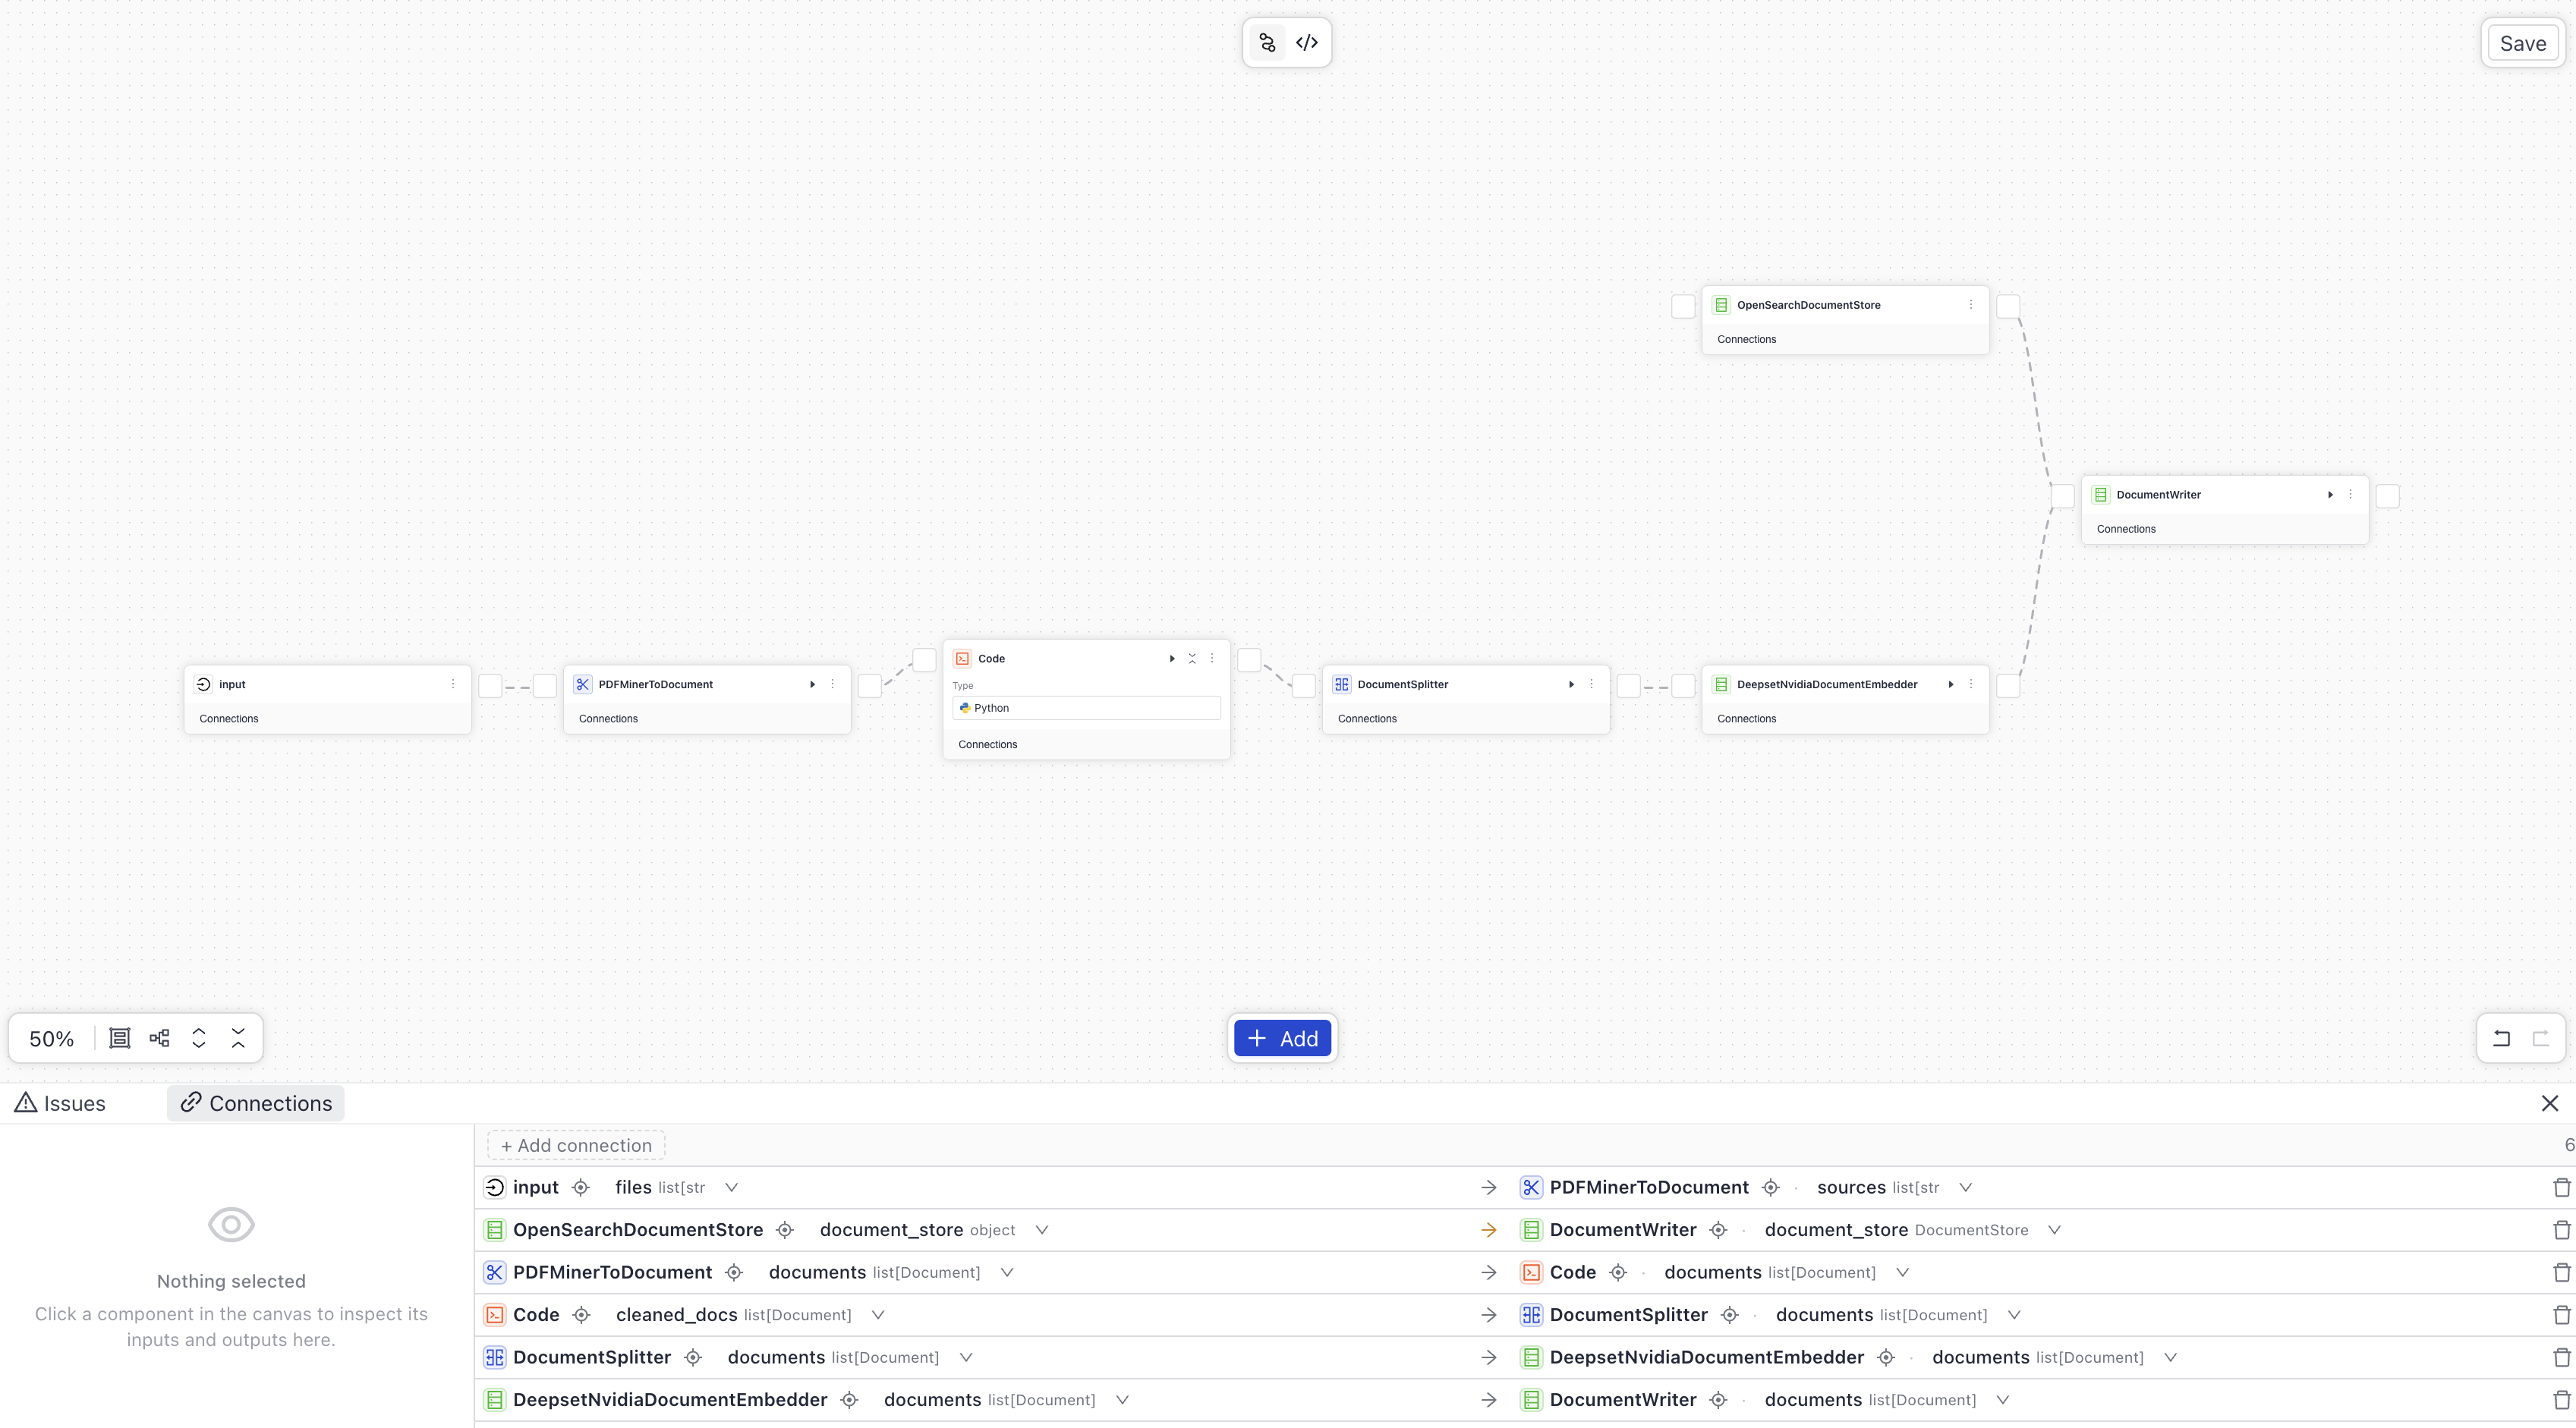
This is what your index should look like:
- Connect
-
Save and enable the index.
Click to view the complete index configuration
components:
  Code:
    type: deepset_cloud_custom_nodes.code.code_component.Code
    init_parameters:
      code: "from haystack import component, Document\nimport re\nfrom typing import List\n\n@component\nclass Code:\n    \"\"\"\n    Masks personally identifiable information in CV text before LLM processing.\n    \"\"\"\n    @component.output_types(cleaned_docs=List[Document])\n    def run(self, documents: List[Document]) -> dict:\n        cleaned_docs = []\n        \n        for doc in documents:\n            redacted = doc.content\n\n            # Email addresses\n            email_pattern = r'\\b[A-Za-z0-9._%+-]+@[A-Za-z0-9.-]+\\.[A-Za-z]{2,}\\b'\n            redacted = re.sub(email_pattern, '[EMAIL]', redacted)\n\n            # LinkedIn URLs\n            linkedin_pattern = r'linkedin\\.com/in/[A-Za-z0-9_-]+'\n            redacted = re.sub(linkedin_pattern, '[LINKEDIN]', redacted, flags=re.IGNORECASE)\n\n            # GitHub URLs\n            github_pattern = r'github\\.com/[A-Za-z0-9_-]+'\n            redacted = re.sub(github_pattern, '[GITHUB]', redacted, flags=re.IGNORECASE)\n\n            # Phone numbers: +44 7700 112233, 07700 112233, 798072811, etc.\n            phone_pattern = r'(\\+\\d{1,3}[\\s.-]?)?\\(?\\d{2,4}\\)?[\\s.-]?\\d{3,4}[\\s.-]?\\d{3,4}|\\b\\d{9,11}\\b'\n            redacted = re.sub(phone_pattern, '[PHONE]', redacted)\n\n            # UK postcodes: BS8 1AF, M1 4HE, EC1A 1BB\n            postcode_pattern = r'\\b[A-Z]{1,2}\\d[A-Z\\d]?\\s?\\d[A-Z]{2}\\b'\n            redacted = re.sub(postcode_pattern, '[POSTCODE]', redacted, flags=re.IGNORECASE)\n\n            # Street addresses (line containing number + street type)\n            street_pattern = r'\\d+\\s+[\\w\\s]+(?:Street|St|Road|Rd|Avenue|Ave|Lane|Ln|Drive|Dr|Way|Court|Ct|Place|Pl|Square|Sq|Close|Crescent|Terrace|Grove|Park|Gardens|Row|Mews|Hill|Green|Wood|Gate|Walk|Fields|Rise|View|Valley|Meadow|Heights)\\b[^,\\n]*'\n            redacted = re.sub(street_pattern, '[ADDRESS]', redacted, flags=re.IGNORECASE)\n\n            # Date of birth patterns: DOB: 15/03/1988, Date of Birth: 15 March 1988\n            dob_pattern = r'(DOB|Date of Birth|Born|Birthday|D\\.O\\.B\\.?)[\\s:]*\\d{1,2}[\\s./-](\\d{1,2}|Jan(?:uary)?|Feb(?:ruary)?|Mar(?:ch)?|Apr(?:il)?|May|Jun(?:e)?|Jul(?:y)?|Aug(?:ust)?|Sep(?:tember)?|Oct(?:ober)?|Nov(?:ember)?|Dec(?:ember)?)[\\s./-]\\d{2,4}'\n            redacted = re.sub(dob_pattern, '[DATE_OF_BIRTH]', redacted, flags=re.IGNORECASE)\n\n            # National Insurance Number (UK): AB 12 34 56 C\n            nino_pattern = r'\\b[A-Z]{2}\\s?\\d{2}\\s?\\d{2}\\s?\\d{2}\\s?[A-Z]\\b'\n            redacted = re.sub(nino_pattern, '[NATIONAL_ID]', redacted, flags=re.IGNORECASE)\n\n            cleaned_docs.append(Document(content=redacted, meta=doc.meta))\n\n        return {\"cleaned_docs\": cleaned_docs}"
  PDFMinerToDocument:
    type: haystack.components.converters.pdfminer.PDFMinerToDocument
    init_parameters:
      line_overlap: 0.5
      char_margin: 2
      line_margin: 0.5
      word_margin: 0.1
      boxes_flow: 0.5
      detect_vertical: true
      all_texts: false
      store_full_path: false
  DocumentSplitter:
    type: haystack.components.preprocessors.document_splitter.DocumentSplitter
    init_parameters:
      split_by: word
      split_length: 200
      split_overlap: 0
      split_threshold: 0
      splitting_function:
      respect_sentence_boundary: false
      language: en
      use_split_rules: true
      extend_abbreviations: true
      skip_empty_documents: true
  DeepsetNvidiaDocumentEmbedder:
    type: deepset_cloud_custom_nodes.embedders.nvidia.document_embedder.DeepsetNvidiaDocumentEmbedder
    init_parameters:
      model: intfloat/multilingual-e5-base
      prefix: ''
      suffix: ''
      batch_size: 32
      meta_fields_to_embed:
      embedding_separator: \n
      truncate:
      normalize_embeddings: true
      timeout:
      backend_kwargs:
  DocumentWriter:
    type: haystack.components.writers.document_writer.DocumentWriter
    init_parameters:
      policy: NONE
      document_store:
        type: haystack_integrations.document_stores.opensearch.document_store.OpenSearchDocumentStore
        init_parameters:
          hosts:
          index: ''
          max_chunk_bytes: 104857600
          embedding_dim: 768
          return_embedding: false
          method:
          mappings:
          settings:
          create_index: true
          http_auth:
          use_ssl:
          verify_certs:
          timeout:

connections:  # Defines how the components are connected
- sender: PDFMinerToDocument.documents
  receiver: Code.documents
- sender: Code.cleaned_docs
  receiver: DocumentSplitter.documents
- sender: DocumentSplitter.documents
  receiver: DeepsetNvidiaDocumentEmbedder.documents
- sender: DeepsetNvidiaDocumentEmbedder.documents
  receiver: DocumentWriter.documents

inputs:  # Define the inputs for your pipeline
  files:                            # This component will receive the files to index as input
  - PDFMinerToDocument.sources

max_runs_per_component: 100

metadata: {}
Result: You have created an index that can process PDF files and masks sensitive personal information using custom code. The index is enabled and ready to process files.
Index Files
Now, let's upload sample files to the workspace and index them.
- Download the sample files from the sample-cvs folder in Google Drive and unzip it to a location on your computer. You should have five PDF files.
- In Haystack Platform, go to Files and click Upload Files.
- Choose the five PDF files you just downloaded and click Upload.
- Wait until the upload finishes. You should have five PDF files in your workspace.
- Go to Indexes and click your PII-masking-index. This opens the index details page where you can see it's indexing the files you uploaded.
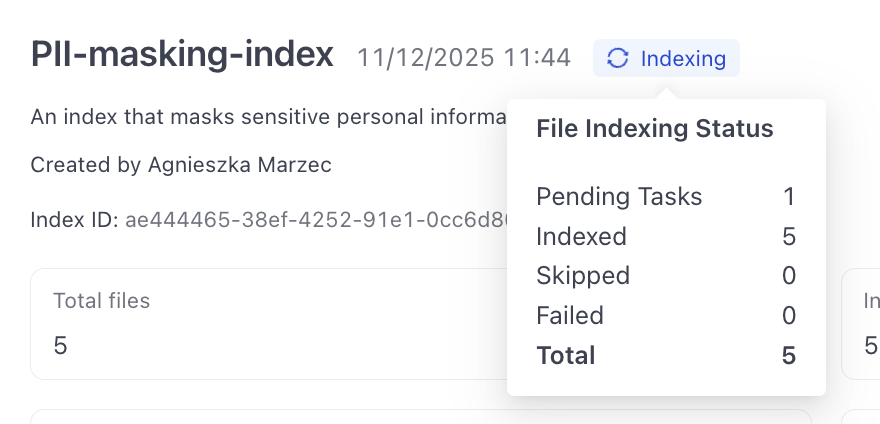
- Wait until the index status changes to Indexed and all the files show as Indexed.
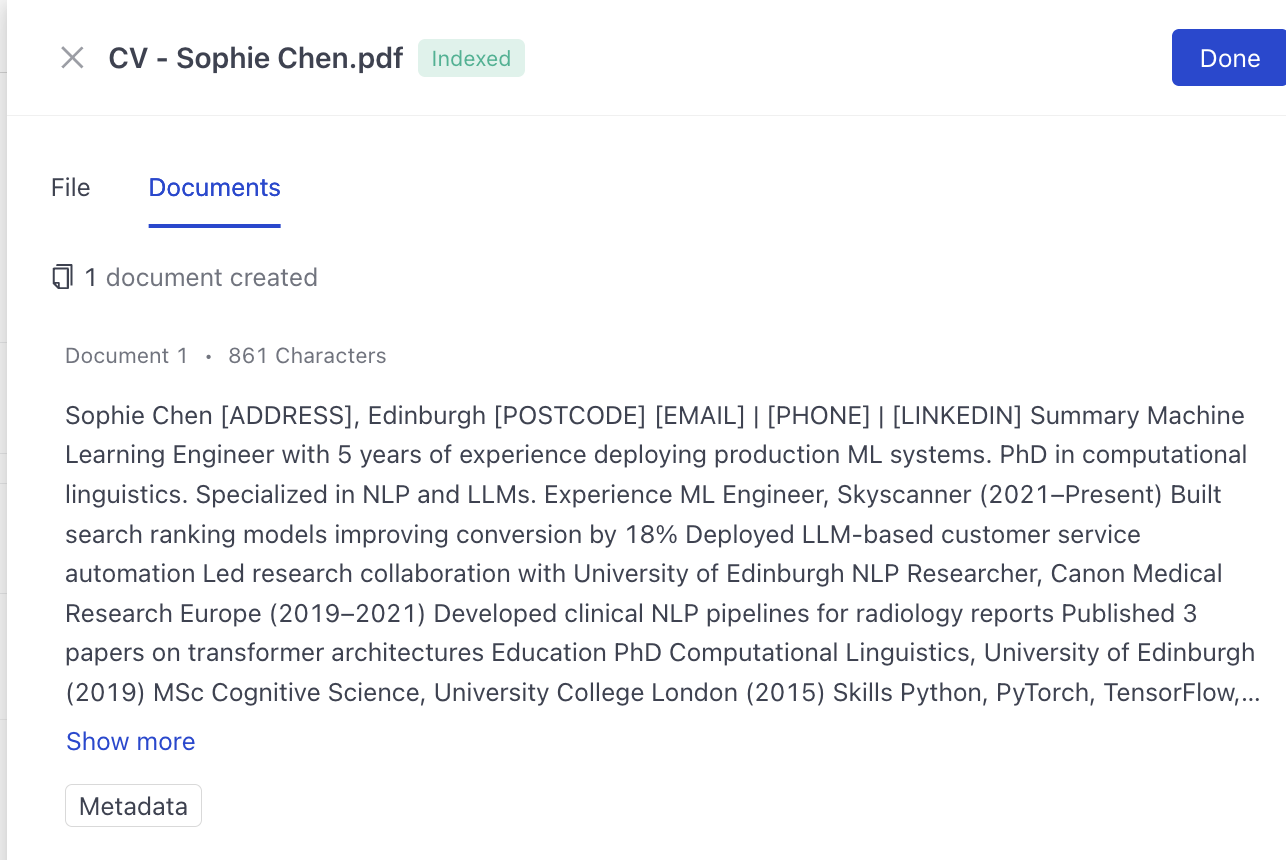
- Click View next to the first file and switch to the Documents tab. You should see the document produced from this file with the sensitive information masked.
Result: Congratulations! You have created an index that can process PDF files and masks sensitive personal information using custom code. You've also learned how to use the Code component in your apps.
Was this page helpful?