Tutorial: Building an IT Helpdesk Agent with Multiple Knowledge Bases
Build an AI agent that answers employee IT questions by automatically deciding which knowledge base to search: an internal IT procedures database or a vendor software documentation database. The agent reads the question, picks the right tool, and synthesizes an answer from the relevant documents.
The agent uses two search pipelines as tools. One pipeline searches the internal IT documentation, the other searches the vendor software documentation. The agent decides which tool to use based on the question.
- Level: Intermediate
- Time to complete: 25 minutes
- Prerequisites:
- A basic understanding of pipelines and indexes in Haystack Platform. For details, see Pipelines and Indexes.
- A basic understanding of agents in Haystack Platform. For details, see AI Agent.
- A workspace in Haystack Platform, where you'll create your agent and its tools. For help, see Quick Start Guide.
- An API key from an active OpenAI account (or another model provider that supports tool calls). Connect Haystack Enterprise Platform to your OpenAI account. For help, see Use OpenAI Models.
- Goal: After completing this tutorial, you'll have an IT helpdesk agent that answers employees questions based on two knowledge bases: an internal one and vendor documentation. This tutorial uses sample files for the knowledge bases. You can replace them with your own files.
- Keywords: agent, tools, pipeline tool, knowledge base, RAG, routing
What You're Building
Employees ask two very different types of IT questions:
- Internal process questions: "How do I request a software license?" or "What's the VPN access procedure?" These need answers from company-specific documentation and internal policies, IT procedures, and how-tos.
- Software how-to questions: "How do I share my screen in Zoom?" or "How do I set up email on my phone?" These need answers from vendor product documentation.
A single knowledge base struggles with both types of questions and combining them in one search often dilutes relevance.
This tutorial shows you how to create two focused search pipelines, each backed by its own index, and wire them together into an agent that picks the right one for each question.
Upload Files
First, upload the sample files to your workspace:
- Download the agent-it-helpdesk folder from gdrive and save it to a location on your computer.
- Unzip the folder and open it.
- In Haystack Enterprise Platform, go to Files>Upload Files and choose all the files in the folder.
- Click Upload.
Result: You have four files in your workspace: vpn-access.md, software-requests.md, zoom-guide.md, and microsoft365-guide.md.
Add Metadata to the Files
We'll add metadata to the files to mark internal knowledge base files and vendor documentation files. Based on the metadata, we'll create two separate indexes: one for internal IT documentation and one for vendor documentation.
As we only have four files, we'll add metadata to the files manually. You can also use the SDK or REST API to add metadata to the files. For details, see Add Metadata to Your Files.
-
On the Files page, click More Actions next to the
zoom-guide.mdfile and choose View Metadata.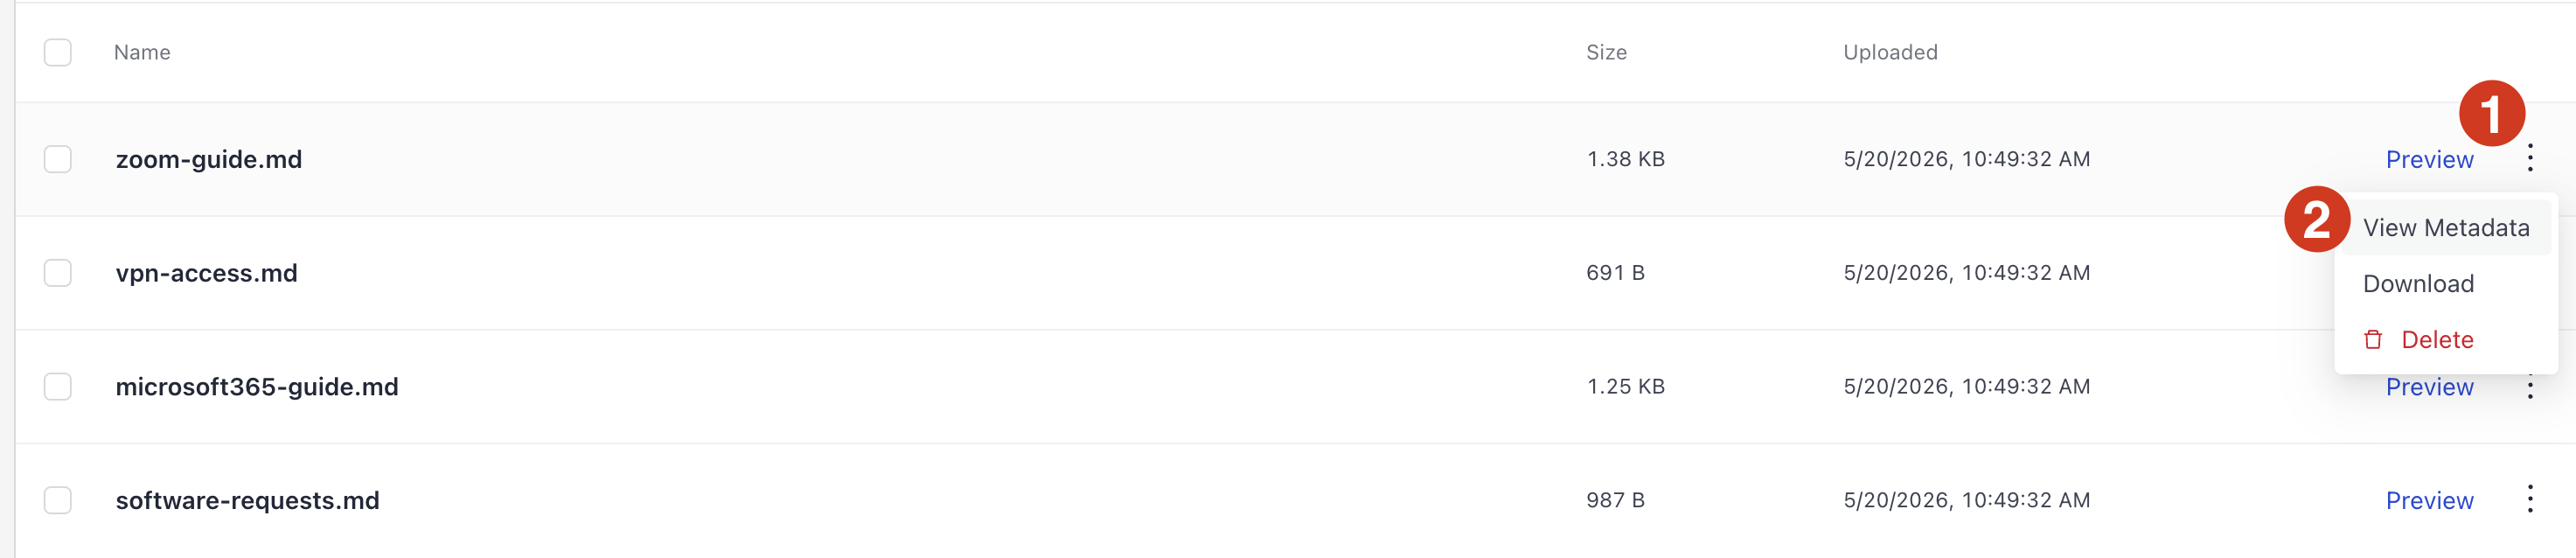
-
Click Add Metadata.
-
Leave Keyword as type, type
knowledgebaseas the key, andproductas the value, and save your changes.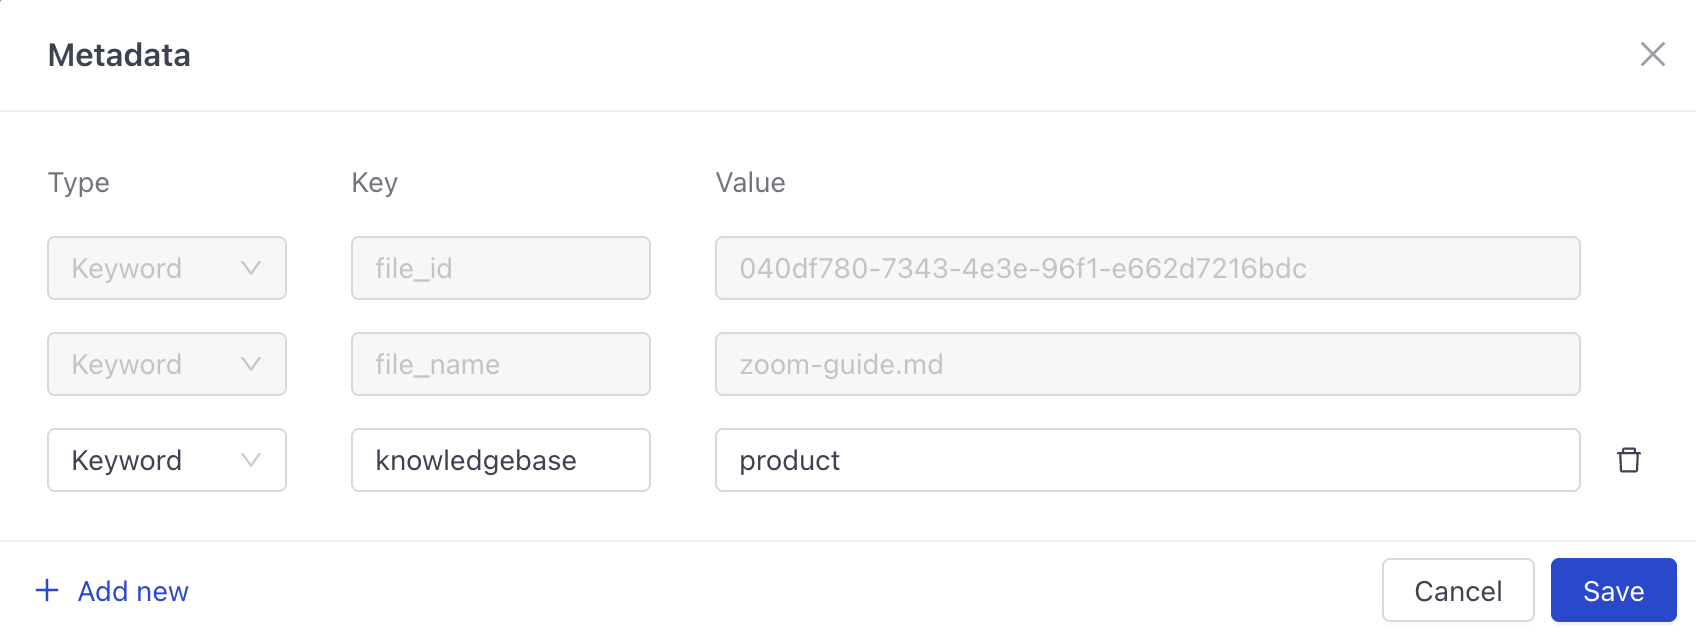
-
Repeat steps 1 to 3 for the
microsoft365-guide.mdfile. -
For the
vpn-access.mdandsoftware-requests.mdfiles, leave Keyword as type, typeknowledgebaseas the key, andinternalas the value, and save your changes.
Result: You have added metadata to the files to differentiate between internal and vendor documentation.
Create the Knowledge Bases
We'll need two knowledge bases: one for internal documentation and one for vendor documentation. These knowledgebases will act as tools for the agent to help it answer user questions.
Each knowledgebase needs an index and a search pipeline.
Create the Index for Internal Documentation
As we only have Markdown files, we'll create a simple index that uses the MarkdownToDocument component to convert the files to documents. Then, we'll use MetadataRouter to write only the documents with the knowledgebase metadata set to internal to the document store.
If you have other file types, you can start from the Standard Index (English) template and then add the MetadataRouter component to filter the documents based on the metadata.
-
In the navigation, go to Indexes>Create Index.
-
Choose Build your own.
-
Type
internal-docsas the index name. -
Click Create Index. You're taken to the Builder.
-
In Builder, switch to the YAML view and paste the following index configuration:
# haystack-pipelinecomponents:MarkdownToDocument:type: haystack.components.converters.markdown.MarkdownToDocumentinit_parameters:table_to_single_line: falseprogress_bar: truestore_full_path: falseDocumentWriter:type: haystack.components.writers.document_writer.DocumentWriterinit_parameters:policy: NONEdocument_store:type: haystack_integrations.document_stores.opensearch.document_store.OpenSearchDocumentStoreinit_parameters:hosts:index: ""max_chunk_bytes: 104857600embedding_dim: 768return_embedding: falsemethod:mappings:settings:index.knn: truecreate_index: truehttp_auth:use_ssl:verify_certs:timeout:nested_fields:MetadataRouter:type: haystack.components.routers.metadata_router.MetadataRouterinit_parameters:rules:internal_documents:conditions:- field: meta.knowledgebasevalue: internaloperator: ==operator: ANDoutput_type: list[haystack.dataclasses.Document]connections:- sender: MarkdownToDocument.documentsreceiver: MetadataRouter.documents- sender: MetadataRouter.internal_documentsreceiver: DocumentWriter.documentsmax_runs_per_component: 100metadata: {}inputs:query: []filters: []files:- MarkdownToDocument.sourcesmessages: [] -
Save and enable the index.
Result: You have created an index for internal documentation. It filters the files to index based on their metadata. The query pipeline will use this index to search internal documents.
Create the Index for Vendor Documentation
This index only indexes files with the metadata knowledgebase set to product.
-
Go to Indexes>Create Index again.
-
Choose Build your own.
-
Type
vendor-docsas the index name. -
Click Create Index. You're taken to the Builder.
-
In Builder, switch to the YAML view and paste the following index configuration:
# haystack-pipelinecomponents:MarkdownToDocument:type: haystack.components.converters.markdown.MarkdownToDocumentinit_parameters:table_to_single_line: falseprogress_bar: truestore_full_path: falseDocumentWriter:type: haystack.components.writers.document_writer.DocumentWriterinit_parameters:policy: NONEdocument_store:type: haystack_integrations.document_stores.opensearch.document_store.OpenSearchDocumentStoreinit_parameters:hosts:index: ""max_chunk_bytes: 104857600embedding_dim: 768return_embedding: falsemethod:mappings:settings:index.knn: truecreate_index: truehttp_auth:use_ssl:verify_certs:timeout:nested_fields:MetadataRouter:type: haystack.components.routers.metadata_router.MetadataRouterinit_parameters:rules:product_documents:conditions:- field: meta.knowledgebasevalue: productoperator: ==operator: ANDoutput_type: list[haystack.dataclasses.Document]connections:- sender: MarkdownToDocument.documentsreceiver: MetadataRouter.documents- sender: MetadataRouter.product_documentsreceiver: DocumentWriter.documentsmax_runs_per_component: 100metadata: {}inputs:query: []filters: []files:- MarkdownToDocument.sourcesmessages: [] -
Save and enable the index.
Result: You have created an index for vendor documentation. It filters the files to index based on their metadata. The query pipeline will use this index to search vendor documents.
Create the Internal Search Pipeline
Let's create a RAG chat pipeline that the agent will use to query internal documentation.
-
In the navigation, go to Pipeline Templates.
-
Open the Conversational category, find the RAG Chat template, hover over it, and click Use Template.
-
Type
internal-it-searchas the pipeline name and click Create Pipeline. You're taken to Builder. -
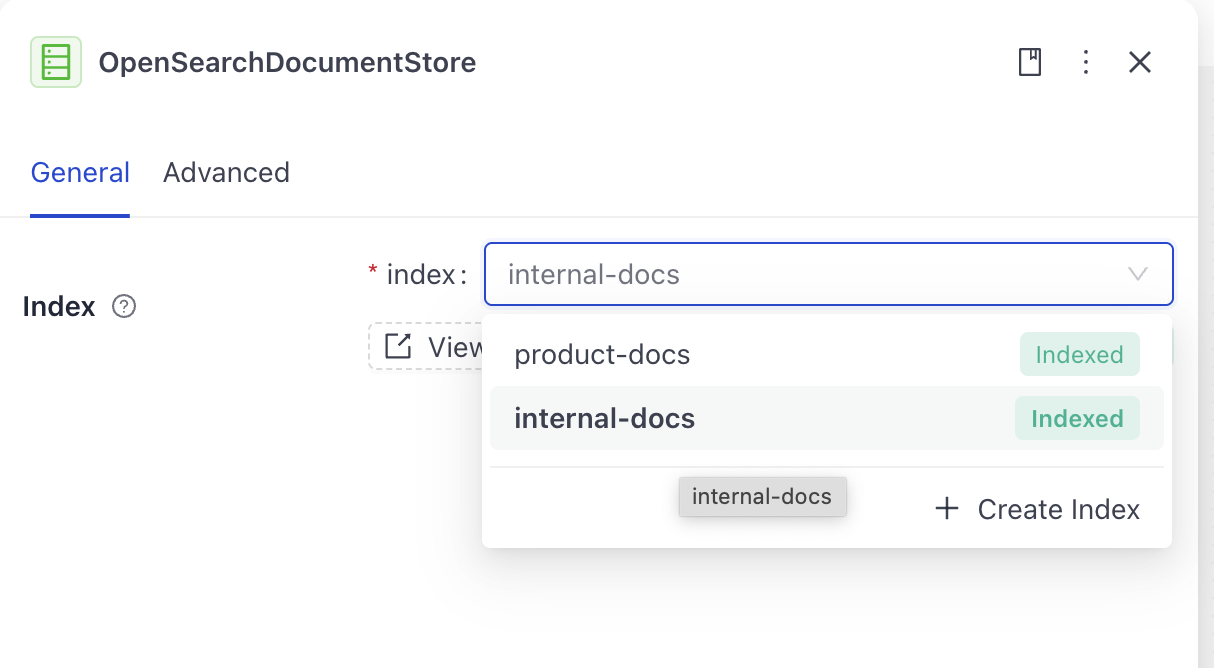
On the canvas, find the
OpenSearchDocumentStorecomponent and click it. This opens the configuration panel. -
Choose internal-docs as the index.
-
Test the pipeline: Click Run Pipeline next to the
Inputcomponent and type "How do I request VPN access?". The pipeline should return the answer from the internal documentation.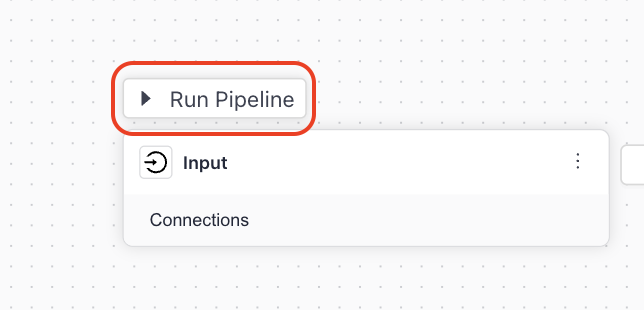
-
Save and deploy the pipeline.
Result: You have created a RAG chat pipeline that searches the internal documentation. It's ready for the agent to use.
Create the Vendor Docs Search Pipeline
-
Leave the Builder and click Pipelines.
-
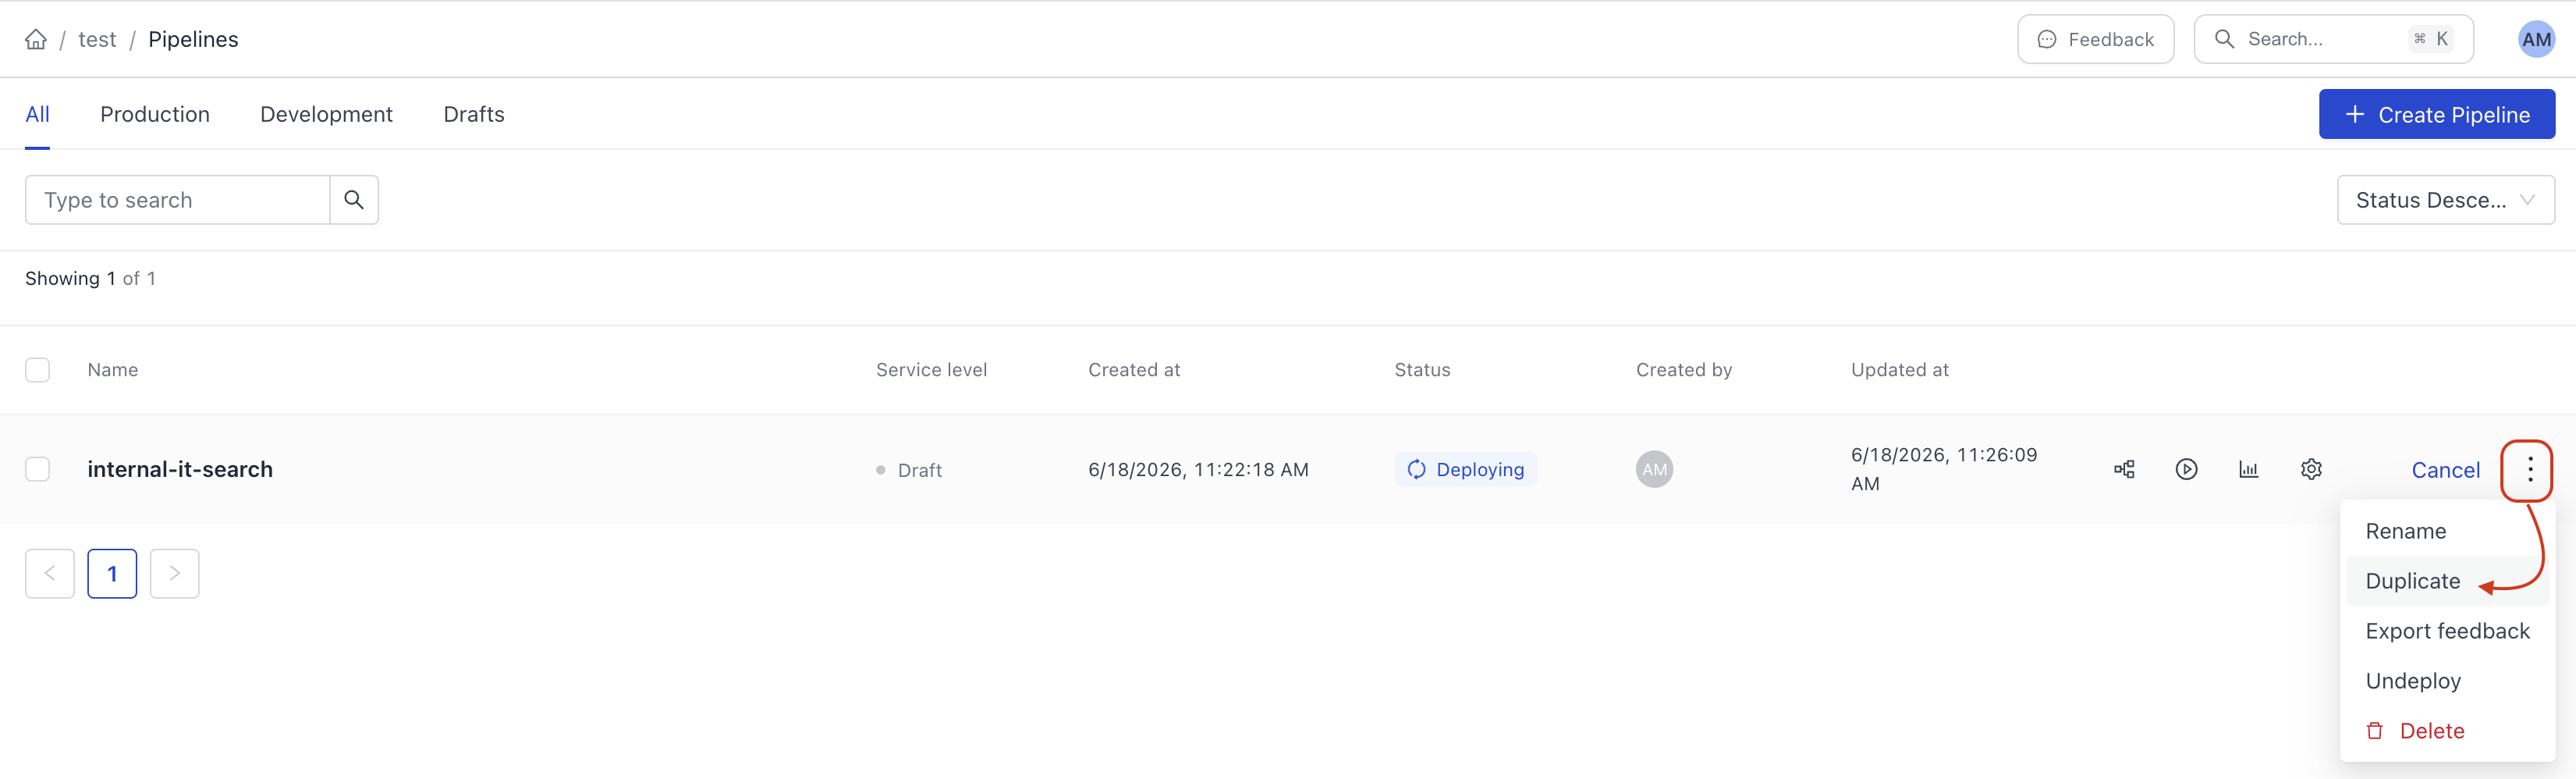
Click More Actions next to the internal-it-search pipeline and choose Duplicate. The duplicated pipeline opens in Builder.
-
Change the pipeline name to
vendor-docs-search. -
Find the
OpenSearchDocumentStorecomponent and open its configuration. -
Choose
product-docsas the index. -
Test the pipeline: Click Run Pipeline next to the
Inputcomponent and type "How do I share my screen in Zoom?". The pipeline should return the answer from the vendor documentation. -
Save and deploy the pipeline.
Result: You have two search pipelines, each pointed at a different index. Now, let's create and agent that will use them as tools.
Build the Agent
Now you'll create the agent that uses both search pipelines as tools and routes questions between them.
Create the Agent Pipeline
-
Go to Pipelines>Create Pipeline>Create empty pipeline.
-
Type
helpdesk-agentas the pipeline name and click Create Pipeline. -
Click Add to open the component library and drag the
Input,Agent, andOutputcomponents onto the canvas.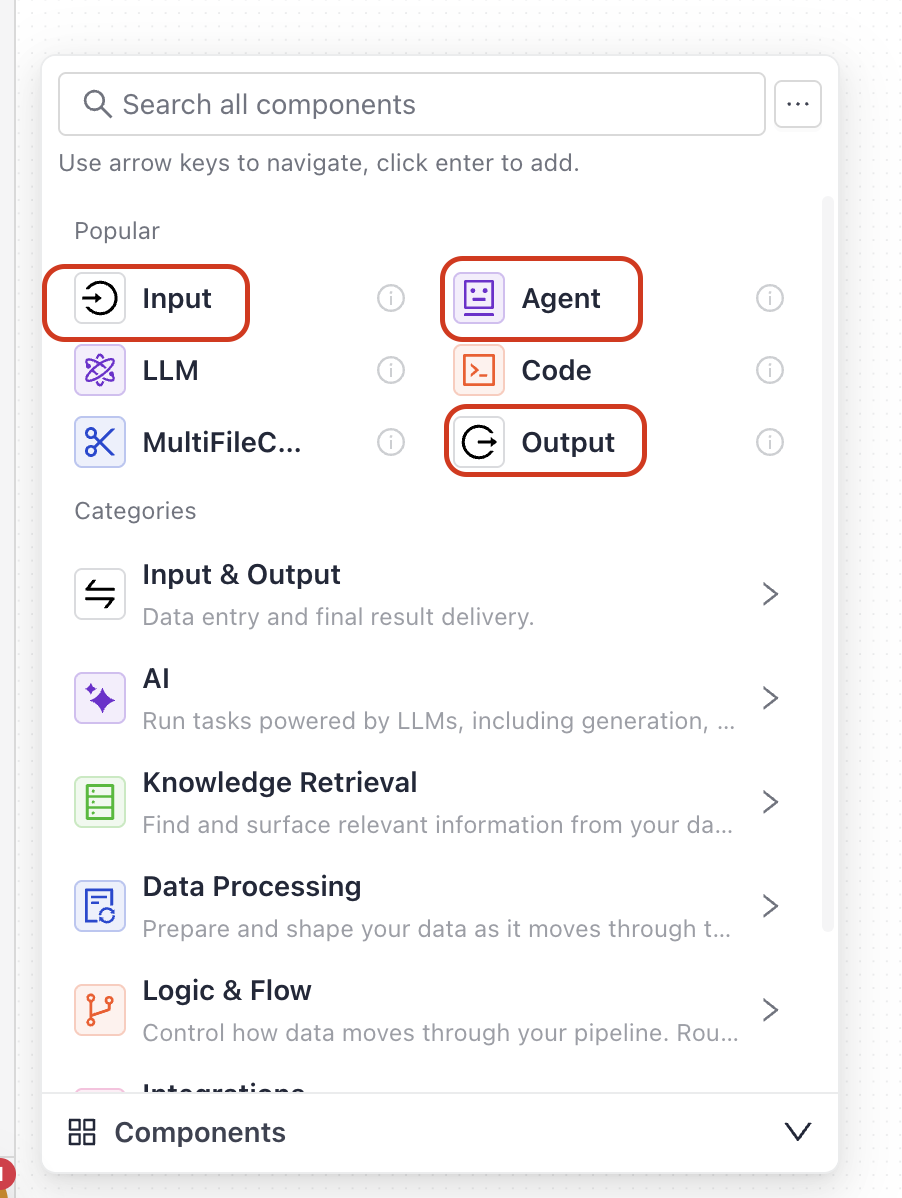
-
Connect
InputtoAgent. -
Connect
AgenttoOutput.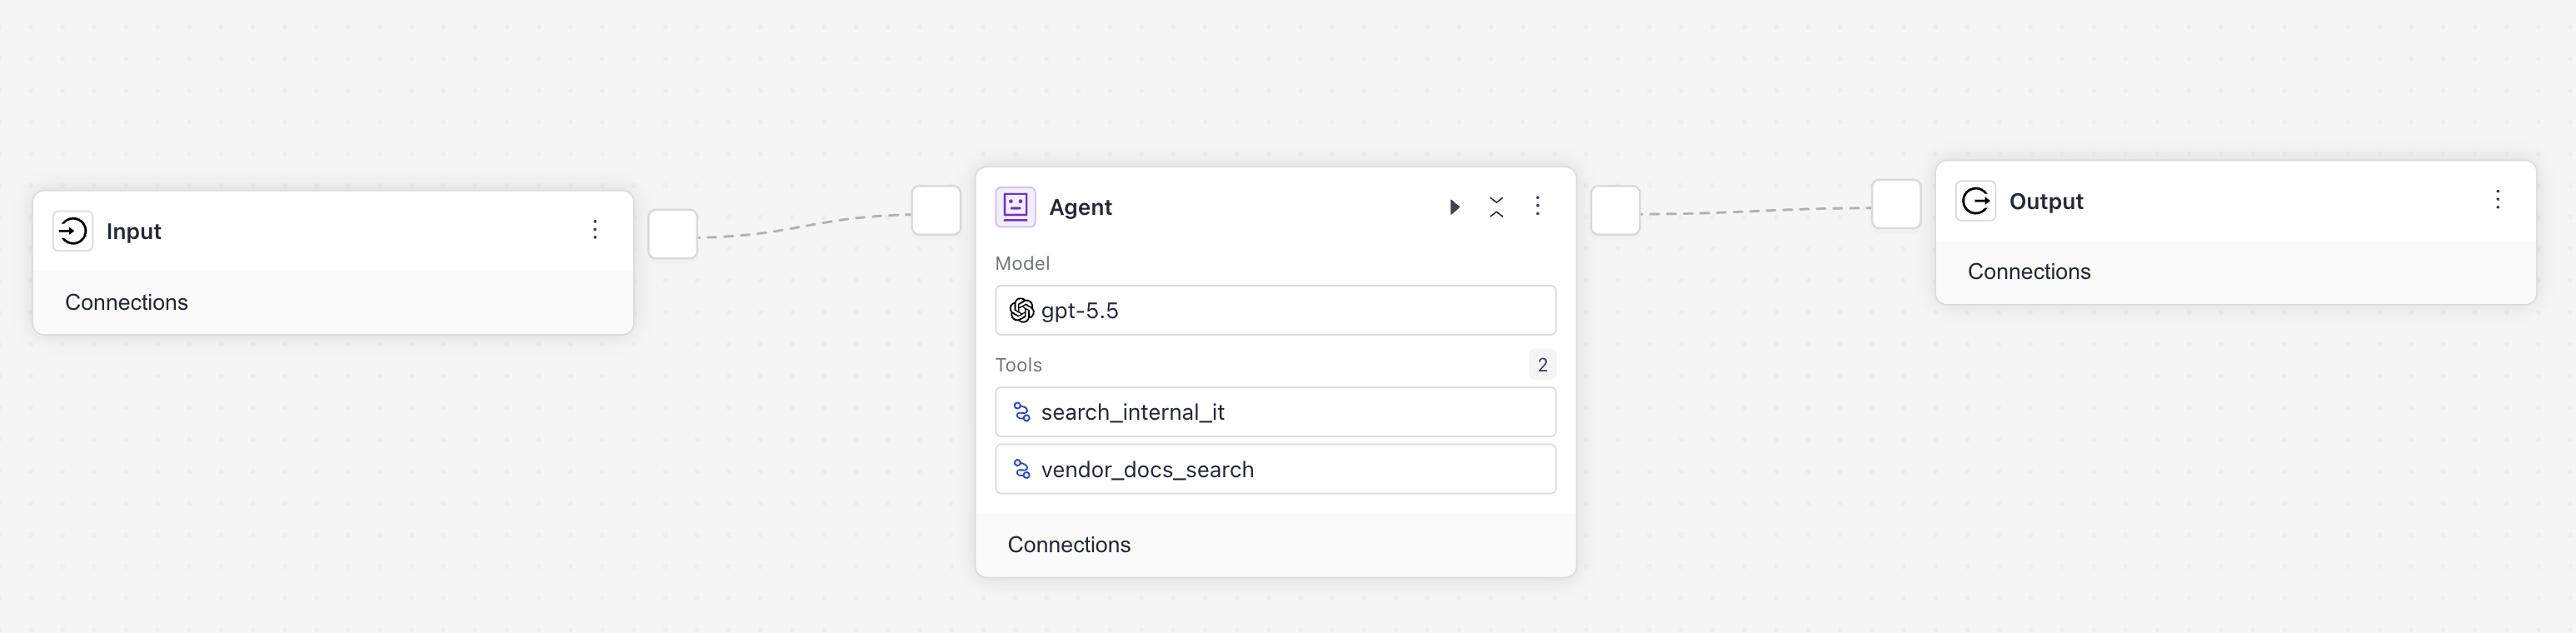
-
Configure the Agent:
-
Click Model on the
Agentcomponent card to open its configuration panel. -
Choose
gpt-5.4(or another model that supports tool calls) from the list. -
In the System Prompt field, paste the following prompt:
You are an IT helpdesk assistant for Acme Corp. You help employees solve IT problems and answer questions about IT processes and software.You have two tools:- search_internal_it: Use this for questions about Acme Corp's internal IT policies and procedures—requesting software, getting VPN access, IT support processes, internal how-tos.- search_vendor_docs: Use this for questions about how to use software products—Zoom, Microsoft 365, and other applications.When a question involves both internal processes and software (for example, "I can't connect to Teams because my VPN is blocking it"), use both tools before answering.Base your answer only on the information you find. Cite which documents you used. If you can't find the answer in either knowledge base, say so clearly and tell the employee to contact the IT helpdesk directly at helpdesk@acmecorp.internal. -
Leave the User Prompt field empty. You connected
Input.messagestoAgent.messages, so user questions from the chat window reach the agent directly. -
In the Tools section, click Add Tool.
-
Choose Pipeline as the tool type.
-
On the Create Pipeline Tool window, choose to start from Existing pipeline and choose
internal-it-searchfrom the list. -
Leave Current draft as the pipeline version.
-
Type
search_internal_itas the tool name. -
Type the following as the tool description:
Search Acme Corp's internal IT documentation. Use this tool for questions about internalIT policies, procedures, and processes—such as requesting software licenses, getting VPNaccess, IT support escalation, new employee IT setup, or any company-specific IT how-tos.- Click Add Pipeline Tool.
search_internal_itis added to the Tools section. - Click Add Tool again to add the second tool.
- Choose Pipeline as the tool type.
- On the Create Pipeline Tool window, choose to start from Existing pipeline and choose
vendor-docs-searchfrom the list. - Leave Current draft as the pipeline version.
- Type
search_vendor_docsas the tool name. - Type the following as the tool description:
Search vendor software documentation. Use this tool for questions about how to usespecific applications and products—such as Zoom features, Microsoft 365, setting upemail on mobile, or any other software how-to questions.- Click Add Pipeline Tool.
search_vendor_docsis added to the Tools section. - Close the Agent configuration panel.
-
Result: You have created an agent pipeline with two tools: search_internal_it and search_vendor_docs.
Test the Agent
Before deploying, test the agent in Builder to confirm it routes questions correctly.
- Click Run on the
Agentcomponent card. - In
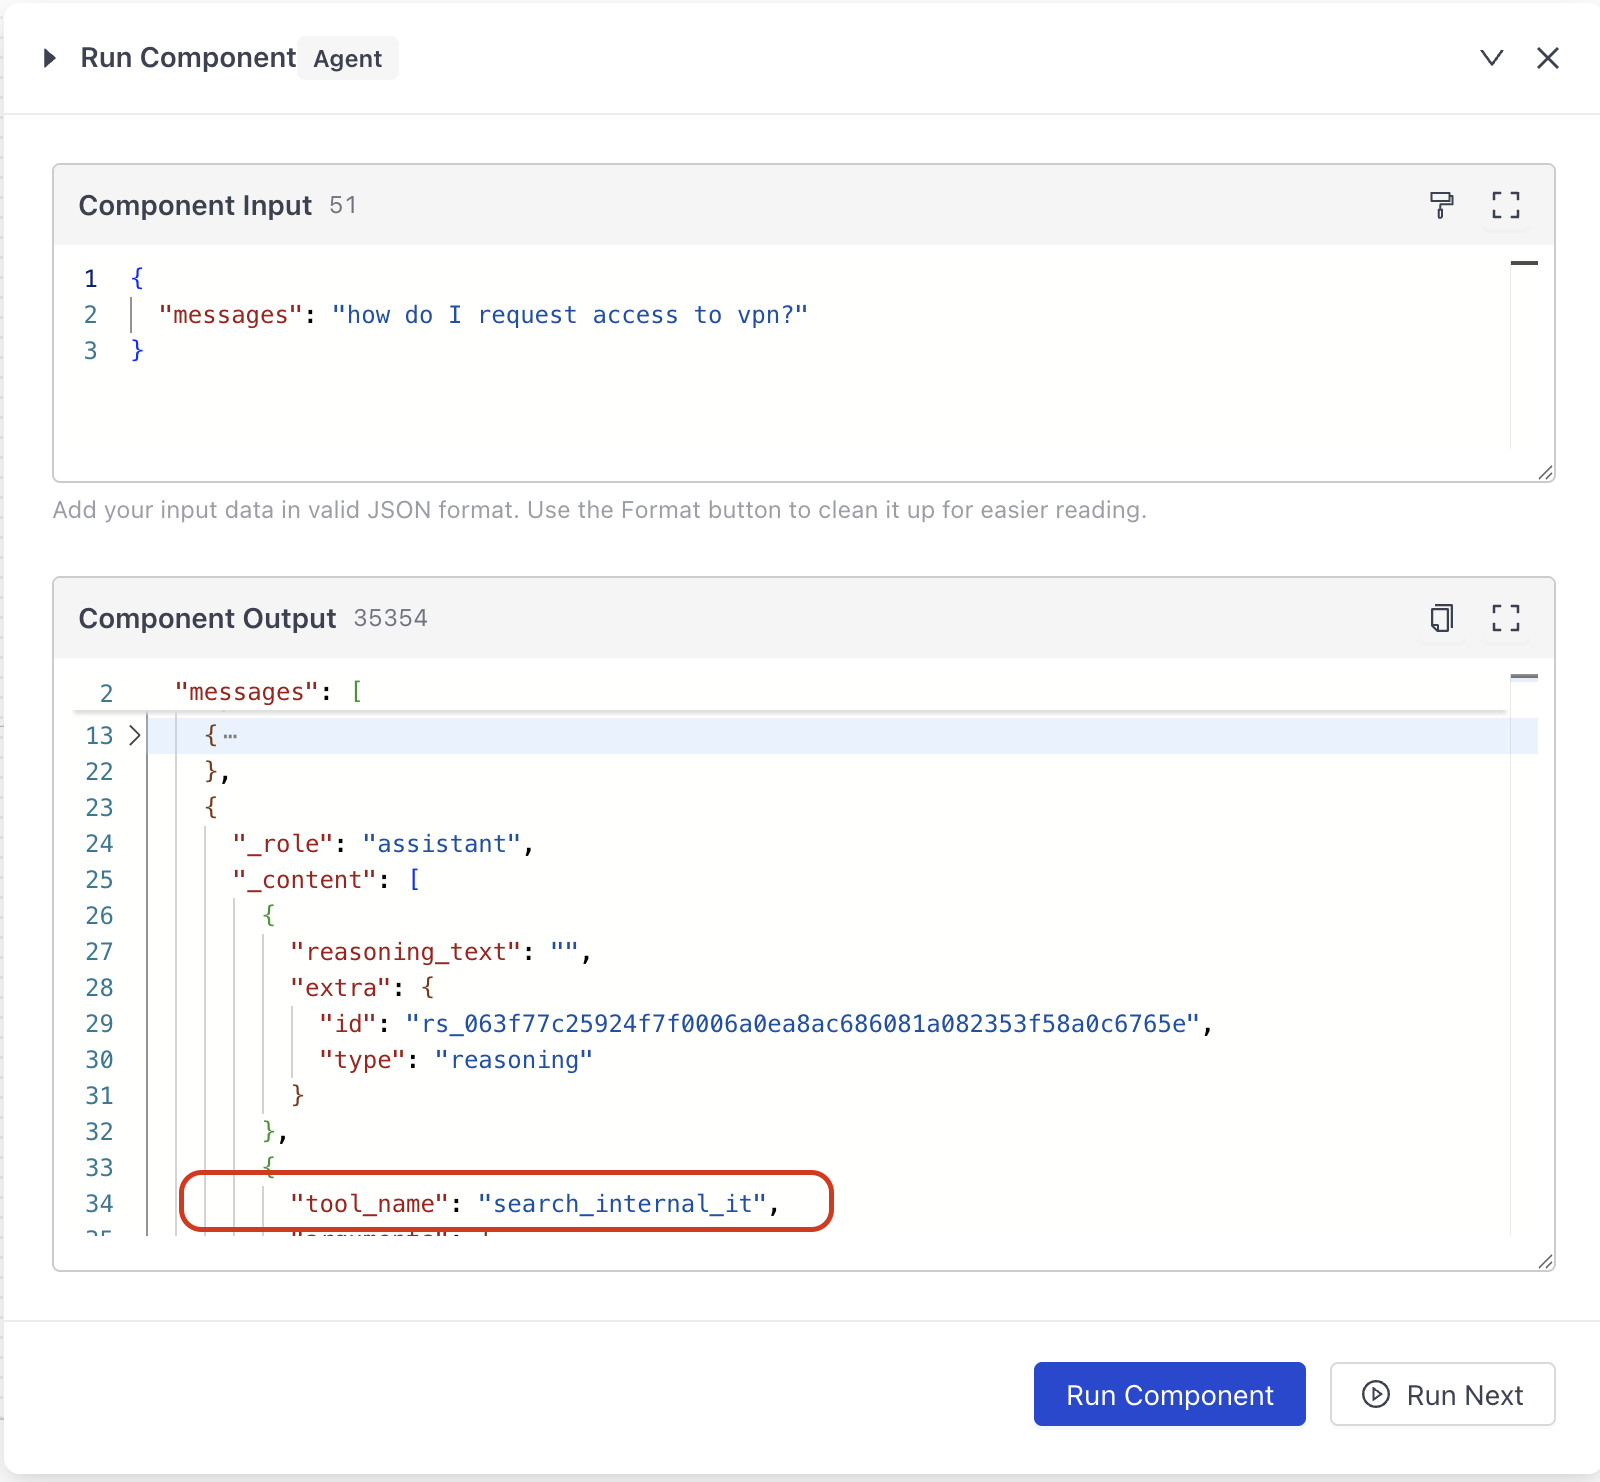
messages, type "How do I request access to vpn?" and run the agent.
Result: The agent should call search_internal_it, find the VPN request procedure from vpn-access.md, and return step-by-step instructions including the IT Service Portal link. To check which tool was used, find a message with "_role": "assistant" in the component output and look for the "tool_name".
You can also test the agent with a question that requires both tools, such as: "I need to install Zoom on my laptop—how do I get a license and then set up the background?". The agent should call search_internal_it to find the software license request process, then call search_vendor_docs to find the virtual background instructions, and combine both into a single answer.
Deploy the Agent
- In Builder, click Deploy.
- Wait until the pipeline status changes to Deployed.
Result: Congratulations! Your helpdesk agent is live. You can now share it with your team and start using it to answer IT questions. For instructions on how to share the agent, see Share a Pipeline Prototype.
What To Do Next
Your agent is at the development service level. Before moving to production:
- Test it with a wider range of employee questions to check that routing is accurate.
- Adjust the tool descriptions and system prompt if the agent consistently picks the wrong tool for certain question types.
Was this page helpful?