Create a Pipeline
Create a pipeline from scratch or choose one of the available templates for an easy start. You can use the guided workflow, code editor, or REST API.
You must be an Admin to perform this task.
About This Task
Each pipeline file defines two pipelines:
- An indexing pipeline that defines how your files are preprocessed. Whenever you add a file, it is preprocessed by all deployed pipelines.
- A query pipeline that describes how the query is run.
There are multiple ways to create a pipeline:
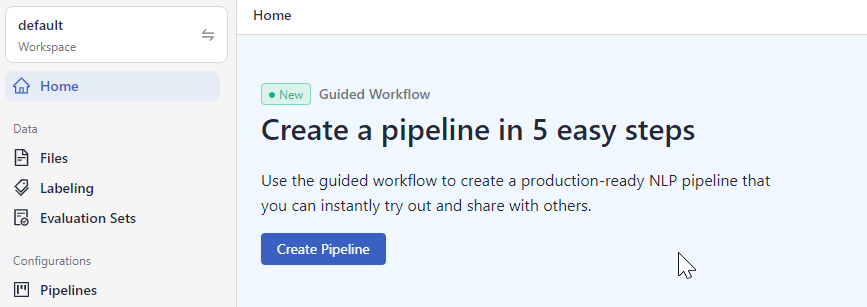
- Using the guided workflow: Choose this method if you're new to pipelines and you'd like us to guide you through the process of creating one. Just tell us what you want to do and we'll create a pipeline that matches your goals best. You'll be able to use it right away.
- Using Pipeline Designer: Choose this method to create your own pipeline from one of the ready-made templates or from scratch using a code editor in Pipeline Designer. The editor comes with a pipeline preview that shows you the pipeline structure as a diagram. This makes it easier to understand how data flows through your pipeline.
- Using API: Choose this way if you already have a pipeline YAML file and want to programmatically upload it to deepset Cloud.
Prerequisites
- To learn about how pipelines and nodes work in deepset Cloud, see Pipeline Nodes and About Pipelines.
- To use a hosted model, Connect to Model Providers first so that you don't have to pass the API key within the pipeline. For Hugging Face, this is only required for private models. Once deepset Cloud is connected to a model provider, just pass the model name in the
model_name_or_pathparameter of the node that uses it in the pipeline. deepset Cloud will download and load the model. For more information, see Language Models in deepset Cloud.
Create a Pipeline Using Guided Workflow
Go to the home page. You can access the guided workflow at the top of the page. Click Create Pipeline and follow the steps in the workflow.

Create a Pipeline Using Pipeline Designer
If you already know what your pipeline should look like or want to use one of the ready-made templates, that's the method for you. It's recommended that you have a basic understanding of YAML as that's the programming language in which you create pipelines.
Pipeline Format
Your pipeline definition file is in the YAML format. Make sure that you follow the same indentation structure as in this example:
components: #This part defines your pipeline components and their settings
  - name: MyPreprocessor #this is the name that you want to give to the pipeline node
    type: Preprocessor #this is the node type (class). For more information, see "Pipeline Nodes"
    params: #these are the node's settings
      split_by: passage
      split_length: 1
  - name: DocumentStore
    type: DeepsetCloudDocumentStore #currently only this document store type is supported
    # Continue until you define all components

#After you define all the components that you want to use, define your query and indexing pipelines:
pipelines:
  - name: query
    nodes: #here list the nodes that you want to use in this pipeline, each node must have a name and input
      - name: ESRetriever #this is the name of the node that you specified in the "components" section above
        inputs: [Query] #here you specify the input for this node, this is the name of the node that you specified in the components section
        #and you go on defining the nodes

    #Next, specify the indexing pipeline:
   - name: indexing
     nodes:
       - name: MyPreprocessor
         inputs: [File]
       - name: ESRetriever
       	 inputs: [MyPreprocessor]
         ...
Create a Pipeline
-
Log in to deepset Cloud and go to Pipelines.
-
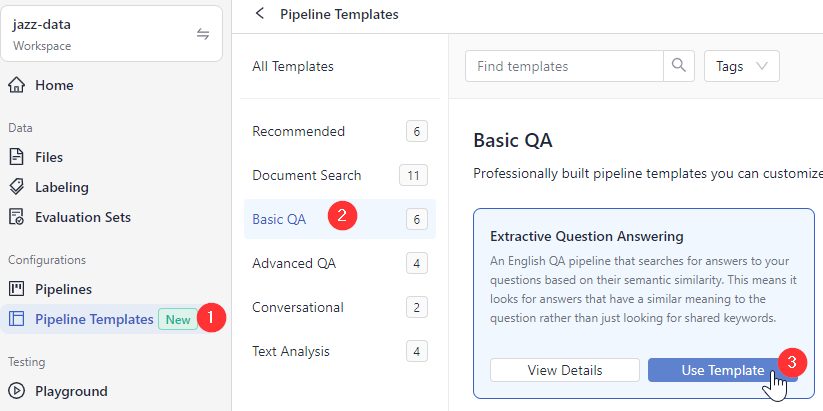
Click Create Pipeline and choose if you want to create a pipeline from an empty file or use a template.
There are pipeline templates available for different types of tasks. All of them work out of the box, but you can also use them as a starting point for your pipeline.-
If you chose an empty file, give your pipeline a name and click Create Pipeline. You're redirected to the Pipelines page. You can find your pipeline in the All tab. To edit the pipeline, click the More Actions menu next to it and choose Edit.

-
If you choose a template, you're redirected to the Pipeline Templates page.
-
Choose a template that best matches your use case, hover over it, and click Use Template.

-
Give your pipeline a name and click Create Pipeline. You land on the Pipelines page. Your pipeline is a draft, which you can find in the Drafts tab. You can now modify the pipeline or use it as it is.
-
Depending on what you want to do:
- To modify the template, click the More Actions menu next to your pipeline and choose Edit. You're redirected to the Designer, where you can edit and save your pipeline. Follow the instructions in step 3 below.
- To use the template as is, go directly to Step 4 below.
-
-
-
(Optional) To modify the template in Designer:
-
- In the
componentssection of the file, configure all the nodes you want to use for indexing and query pipelines. Each node should have the following parameters: name- This is a custom name you give to the node.type- This is the node's class. You can check it in Pipeline Nodes if you're unsure.params- This section is the node's configuration. It lists the parameters for the node and their settings. If you don't configure any parameters, the node uses its default settings for the mandatory parameters. Here's an example:components: - name: Retriever type: EmbeddingRetriever params: document_store: DocumentStore embedding_model: intfloat/e5-base-v2 model_format: sentence_transformers top_k: 10
- In the
- In the
pipelinessection, define your query and indexing pipelines:- For the query pipeline, set the
nametoquery. - For the indexing pipeline, set the
nametoindexing. - For each pipeline, add the
nodessection to define the order of the nodes in your pipeline. Each node has aname(that's the custom name you gave it in thecomponentssection) andinputs(that's the name of the nodes whose input it takes for further processing. It can be one or more nodes.
The input of the first node in the indexing pipeline is alwaysFile.
The input of the first node in the query pipeline is alwaysQuery.
Example:
Tip: Use ctrl + space to see autosuggestions. To see a list of available models, type the Hugging Face organization + / (slash).
Tip: To revert your changes to the last saved version, click Reset.pipelines: - name: query nodes: - name: BM25Retriever inputs: [Query] #Query is always the input of the first node in a query pipeline - name: EmbeddingRetriever inputs: [Query] - name: JoinResults inputs: [BM25Retriever, EmbeddingRetriever] - name: Reranker inputs: [JoinResults] - name: PromptNode inputs: [Reranker] - name: indexing nodes: - name: FileTypeClassifier inputs: [File] - name: TextConverter inputs: [FileTypeClassifier.output_1] - name: PDFConverter inputs: [FileTypeClassifier.output_2] - name: Preprocessor inputs: [TextConverter, PDFConverter] - name: EmbeddingRetriever inputs: [Preprocessor] - name: DocumentStore inputs: [EmbeddingRetriever]
- For the query pipeline, set the
- Save your pipeline. deepset Cloud validates if your pipeline design is correct.
-
-
To use your pipeline, you must first deploy it. Click Deploy next to the pipeline on the Pipelines page or in the top right corner of the Designer. This triggers indexing.
-
To test your pipeline, wait until it's indexed and then go to Playground. Make sure your pipeline is selected, and type your query.
An explained example of a pipeline
First, define the components that you want to use in your pipelines. For each component, specify its name, type, and any parameters that you want to use.
After you define your components, define your pipelines. For each pipeline, specify its name, type (either Query or Indexing), and the nodes that it consists of. For each node, specify its input.
components:   # This section defines nodes that we want to use in our pipelines
  - name: DocumentStore
    type: DeepsetCloudDocumentStore # This is the only supported document store
  - name: Retriever # Selects the most relevant documents from the document store and then passes them on to the Reader
    type: EmbeddingRetriever # Uses a Transformer model to encode the document and the query
    params:
      document_store: DocumentStore
      embedding_model: intfloat/e5-base-v2 # Model optimized for semantic search
      model_format: sentence_transformers
      top_k: 20 # The number of results to return
  - name: Reader # The component that actually fetches answers
    type: FARMReader # Transformer-based reader, specializes in extractive QA
    params:
      model_name_or_path: deepset/roberta-large-squad2 # An optimized variant of BERT, a strong all-round model
      context_window_size: 700 # The size of the window around the answer span
  - name: TextFileConverter # Converts files to documents
    type: TextConverter
  - name: Preprocessor # Splits documents into smaller ones, and cleans them up
    type: PreProcessor
    params:
      split_by: word # The unit by which you want to split your documents
      split_length: 250 # The maximum number of words in a document
      split_overlap: 30 # Enables the sliding window approach
      split_respect_sentence_boundary: True # Retains complete sentences in split documents
      language: en # Used by NLTK to best detect the sentence boundaries for that language

pipelines: # Here you define the pipelines. For each component, specify its input.
  - name: query
    nodes:
      - name: Retriever
        inputs: [Query] # The input for the first node is always a query
      - name: Reader
        inputs: [Retriever] # Input is the name of the component that you defined in the "component" section
  - name: indexing
    nodes:
      - name: TextFileConverter
        inputs: [File]
      - name: Preprocessor
        inputs: [TextFileConverter]
      - name: Retriever
        inputs: [Preprocessor]
      - name: DocumentStore
        inputs: [Retriever]
Create a Pipeline with REST API
This method works well if you have a pipeline YAML ready and want to upload it to deepset Cloud. You need to Generate an API Key first.
Follow the step-by-step code explanation:
Or use the following code:
curl --request POST \
     --url https://api.cloud.deepset.ai/api/v1/workspaces/<YOUR_WORKSPACE>/pipelines \
     --header 'Accept: application/json' \
     --header 'Authorization: Bearer <YOUR_API_KEY>'\
     --data-binary "@path/to/pipeline.yaml"
See the REST API endpoint documentation.
What To Do Next
- If you want to use your newly created pipeline for search, you must deploy it.
- To view pipeline details, such as statistics or feedback, click the pipeline name. This opens the Pipeline Details page.
- To let others test your pipeline, share your pipeline prototype.
Updated 8 months ago
For sample pipelines, see: