Upload Files
Upload your data to deepset AI Platform. The files you upload are then turned into documents and indexed to make them searchable for your pipelines..
Things to note:
- Currently, deepset AI Platform supports files encoded in UTF-8 format. For files with different encoding formats, you may experience issues with display or formatting.
- A single file cannot be larger than 200 MB. If a file exceeds this size, it won't be be uploaded. You can use deepset AI Platform SDK to upload larger files.
- Whenever you upload a file to a workspace, it's indexed by all indexes enabled in this workspace. This means all deployed pipelines then use this file to resolve queries.
About This Task
Supported File Types
You can upload any file types, there are no restrictions. To preprocess most file types, you can add Converters to your index. For the file types for which a converter is unavailable, we recommend preprocessing the files outside of deepset. You can use one of deepset's integrations to do that. For details, see Using Hosted Models and External Services.
To learn more, see also PreProcessing Data with Pipeline Components.
Once you upload your files, you can preview them in deepset. Preview is supported for TXT, PDF, JSON, HTML, MD, XML, CSV, DOCX, DOC, XLSX, and XLS formats.
Metadata
You can upload files together with metadata if you use the SDK or REST API. When uploading from the deepset AI Platform interface, you can add metadata to your files one by one once they're already uploaded.
If you're uploading files with metadata, the resulting documents inherit the metadata from your files.
Preparing file metadata
To add metadata to your files at upload time, create one metadata file for each file you upload. The metadata file must be a JSON file with the same name as the file whose metadata it contains and the extension meta.json.
For example, if you're uploading a file called example.txt, the metadata file should be called example.txt.meta.json. If you're uploading a file called example.pdf, the metadata file should be example.pdf.meta.json.
Here's the format of metadata in your *.meta.json files: {"meta_key1": "value1", "meta_key2": "value2"}.
To learn more about adding metadata, see Add Metadata to Your Files.
To learn about how to use metadata in your search app, see Working with Metadata.
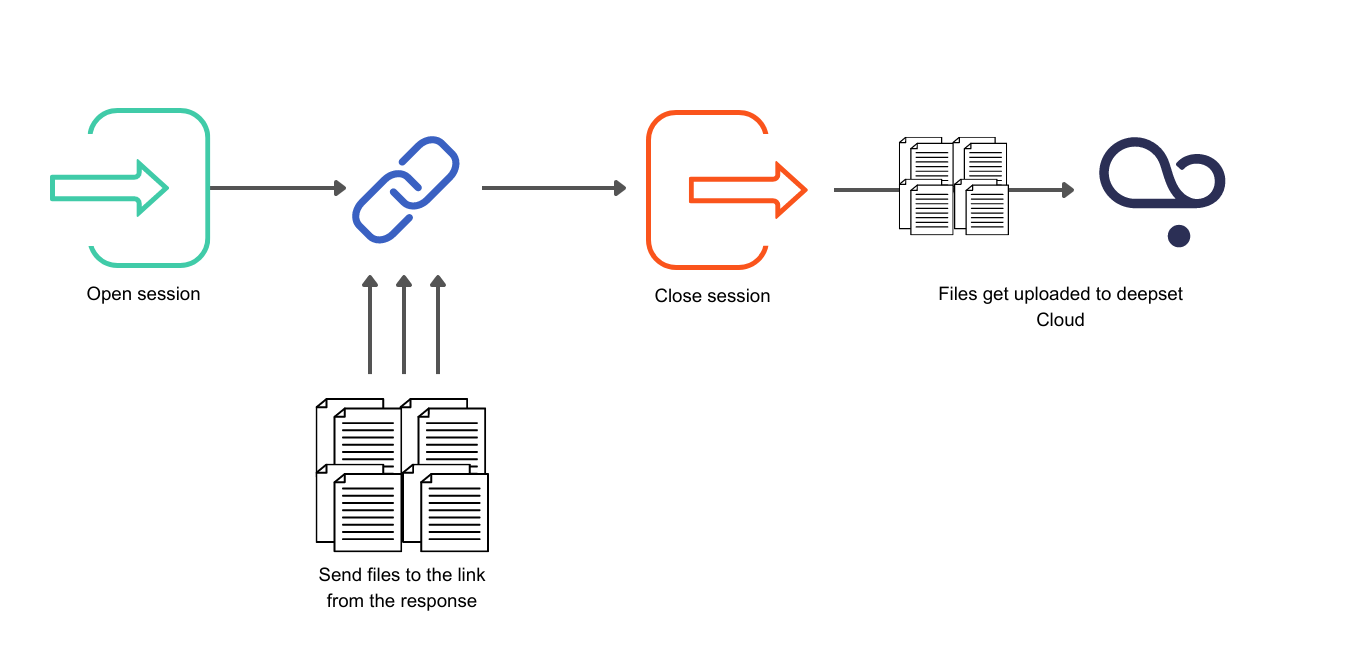
Upload Sessions
The SDK and the Create Upload Session REST API endpoint use upload sessions. To start uploading files, you must first create a session. Sessions help you track the files you're uploading. Each session has an ID and you can check the status of your uploaded files at any time. Files start uploading only after a session is closed. If you don't close a session explicitly, it's automatically closed after 24 hours.
We recommend using upload sessions for large file uploads as they are faster and more efficient. There's no limit on the number of files per session, but we recommend keeping it to a maximum of 50,000 files.
After you upload files to deepset AI Platform, it may take some time before the files become visible.
This diagram explains how the upload sessions work:
Choosing the Best Upload Method
- If you prefer to upload from deepset AI Platform and you have a limited number of files, upload from the UI.
- If you have a lot of data and metadata to upload and are familiar with coding, use the SDK.
- If the SDK upload doesn't work for you, use the REST API.
Prerequisites
-
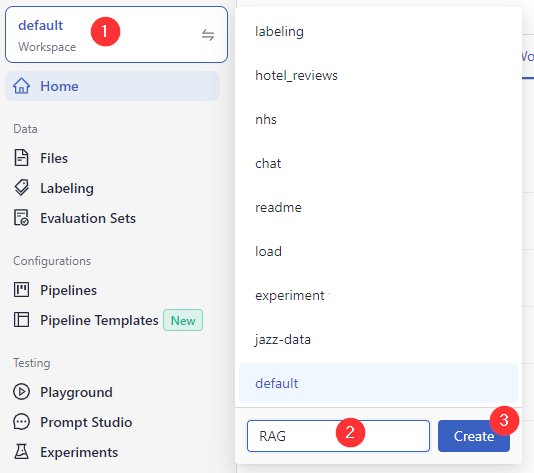
Make sure you have a workspace to upload your files to. You can easily create one if needed:
-
-
In deepset AI Platform, click the workspace name in the upper left corner.
-
Type the name of the workspace you want to create. You can create up to 100 workspaces.
-
-
Upload from the UI
- In deepset AI Platform, go to Files>Upload Files.
- Drag your files and folders to deepset.
- Click Upload. The files may take a while to be processed and displayed on the Files page.
Upload with the SDK
This method is best if you have many files to upload. It makes it possible to add metadata to your files. You can use the command-line interface or Python methods:
See also our tutorials:
- Tutorial: Uploading Files with Metadata through SDK CLI
- Tutorial: Uploading Files with Python Methods
Upload with the REST API
There are to ways to upload with REST API:
- Asynchronously: First, you send a request to open a session. You get a URL and an authentication configuration as a response. You use the URL to upload your files. Then, you close the session. This is when your files are sent to deepset, and the upload is finished.
- Synchronously: You simply send a request to the Upload File endpoint. It's not recommended for large number of files.
Upload in an Upload Session
The upload starts after you close a session by sending a request to the Close Session endpoint. If you don't explicitly close your session, it's automatically closed after 24 hours.
- Generate an API Key. You need this to connect to deepset AI Platform.
- (Optional) Prepare your metadata files. See the Metadata section.
- Open a session using the Create Upload Session API endpoint.
Here's a step-by-step recipe for using the endpoint:
- Send your files to the URL you received in the response using the authentication configuration from the response. You can send both your metadata and raw files to this URL.
- When you send all your files, close the session to start the upload. Here's the request explained step-by-step:
- Wait a while until your files are listed in deepset AI Platform.
An example script to upload files in a session
In this scenario, you save the files locally first:
from dataclasses import dataclass
import os
from pathlib import Path
import time
from typing import Any, Dict, List, Tuple, Optional
from uuid import UUID
import asyncio
import aiofiles # for async file reading
import httpx
import structlog # for nice logs
from tqdm.asyncio import tqdm # to visualise progress of async task completion

DC_ENDPOINT = "https://api.cloud.deepset.ai/api/v1"
WORKSPACE_NAME="<your workspace>"
API_TOKEN="<your_token>"
log = structlog.get_logger(__name__)

def create_session() -> Tuple[UUID, Dict[Any, Any]]:
    response = httpx.post(
        f"{DC_ENDPOINT}/workspaces/{WORKSPACE_NAME}/upload_sessions",
        headers={"Authorization": f"Bearer {API_TOKEN}"},
        json={},
        timeout=120,
    )
    assert response.status_code == 201
    return (
        UUID(response.json()["session_id"]),
        response.json()["aws_prefixed_request_config"],
    )


def close_session(session_id: UUID) -> None:
    response = httpx.put(
        f"{DC_ENDPOINT}/workspaces/{WORKSPACE_NAME}/upload_sessions/{session_id}",
        headers={"Authorization": f"Bearer {API_TOKEN}"},
        json={"status": "CLOSED"},
        timeout=120,
    )
    assert response.status_code == 204, f"status code should be '204', got '{response.status_code}' with content '{response.text}'"


@dataclass
class IngestionStatus:
    finished_files: int
    failed_files: int

def get_session_status(session_id: UUID) -> IngestionStatus:
    response = httpx.get(
        f"{DC_ENDPOINT}/workspaces/{WORKSPACE_NAME}/upload_sessions/{session_id}",
        headers={"Authorization": f"Bearer {API_TOKEN}"},
        timeout=120,
    )
    assert response.status_code == 200
    response_body = response.json()
    print(response_body)
    return IngestionStatus(
        finished_files=response_body["ingestion_status"]["finished_files"],
        failed_files=response_body["ingestion_status"]["failed_files"],
    )

@dataclass
class UploadFileResult:
    file: str
    exception: Optional[Exception] = None

async def upload_file_to_s3(
    file_path: str,
    aws_prefixed_request_config: Dict[Any, Any],
    semaphore:asyncio.BoundedSemaphore,
    concurrency=10
) -> List[UploadFileResult]:
    client = httpx.AsyncClient()
    # upload file asynchronously using prefixed request config
    async with semaphore:
        async with httpx.AsyncClient(
            limits=httpx.Limits(
                max_keepalive_connections=concurrency, max_connections=concurrency
            )
        ) as client:
            try:
                async with aiofiles.open(file_path, "rb") as file:
                    file_name = os.path.basename(file_path)
                    content = await file.read()
                    response = await client.post(
                        aws_prefixed_request_config["url"],
                        data=aws_prefixed_request_config["fields"],
                        files={"file": (file_name, content)},
                        timeout=2000,
                    )
                    assert response.status_code == 204, f"status code should be '204', got '{response.status_code}'"
            except Exception as exc:
                return UploadFileResult(file=file_name, exception=exc)

    return UploadFileResult(file=file_name)

def wait_for_files_to_be_ingested(file_paths, exceptions, session_id):
    total_uploaded_files = len(file_paths) - len(exceptions)
    total_processed_files = 0
    while total_processed_files < total_uploaded_files:
        session_status = get_session_status(session_id)
        log.info(
            "Polling status",
            failed_files=session_status.failed_files,
            finished_files=session_status.finished_files,
        )
        total_processed_files = (
            session_status.failed_files + session_status.finished_files
        )
        time.sleep(3)


#### the main flow ####
async def main():
    session_id, aws_prefixed_request_config = create_session()

    # get a list of files as below, alternatively give a list of explicit paths
    file_paths = [p for p in Path('./path/to/data/dir').glob('*')]
    concurrency = 10
    semaphore = asyncio.BoundedSemaphore(concurrency)
    tasks = []
    for file_path in file_paths:
        # upload files
        tasks.append(
            upload_file_to_s3(file_path, aws_prefixed_request_config, semaphore=semaphore, concurrency=concurrency)
        )

    results:List[UploadFileResult] = await tqdm.gather(*tasks)

    exceptions = [r for r in results if r.exception is not None]

    log.info(
        "files uploaded",
        successful=len(results) - len(exceptions),
        failed=len(exceptions),
    )

    if len(exceptions):
        log.warning("upload exceptions", exceptions=exceptions)

    # close session once you are done with uploading
    # the ingestion will start once the session is closed
    close_session(session_id)

    # wait for files to be ingested into deepsetCloud
    wait_for_files_to_be_ingested(file_paths, exceptions, session_id)

if __name__ == '__main__':
    asyncio.run(main())
You can check the status of your session with the Get Session Status API endpoint.
Upload with the Upload File Endpoint
This method is not recommended for uploading more than a few hundred files at once. If you have large numbers of files, upload with the SDK instead.
Here's the request that you can send to upload your files. For more information, you can also see the upload file endpoint documentation. You need to Generate an API Key first.
Here's a step-by-step code with explanations to upload files you already have:
Here's a step-by-step code with explanations on how to upload and create a file in a single request:
And here's a copiable example of both requests:
# This is an example request to send when you're uploading a file:

curl --request POST \
     --url https://api.cloud.deepset.ai/api/v1/workspaces/<YOUR_WORKSPACE_NAME>/files \
     --header 'accept: application/json' \
     --header 'authorization: Bearer <YOUR_API_KEY>' \
     --header 'content-type: multipart/form-data' \
     --form 'meta={"key1":"value1", "key2":"value2"}' \
     --form file=@<YOUR_FILE.PDF>

# This is an example request if you're creating the file during upload:
curl --request POST \
     --url 'https://api.cloud.deepset.ai/api/v1/workspaces/<YOUR_WORKSPACE_NAME>/files?file_name=myFile.txt' \
     --header 'accept: application/json' \
     --header 'authorization: Bearer <YOUR_API_KEY>' \
     --header 'content-type: multipart/form-data' \
     --form 'meta={"key1":"value1", "key2":"value2"}' \
     --form 'text=This is the file text'
Updated 19 days ago