About Experiments
After you created a pipeline, it’s time to evaluate it using experiments. Test your pipeline against all files in your workspace and then share it with other users to collect their feedback.
Experiments
Experiments are an essential step in designing your pipeline as they help you to:
- Find the best pipeline configuration for your use case.
- Evaluate if the pipeline performance is sufficient to move it to production.
- Generate new hypotheses for improving your pipeline.
- Track the settings you used for previous versions of your pipeline.
Before you start experimenting, you must prepare an evaluation dataset containing the questions and gold answers and a pipeline to evaluate. The experiment runs on all the files you have in your workspace at the time you created it.
Here's what happens during an experiment run:
- deepset Cloud runs all the questions from your evaluation dataset through the pipeline you chose.
- The pipeline searches for answers in all the files that were present in your workspace when you created the experiment.
- deepset Cloud then compares the results that the pipeline returned with the answers you labeled in the evaluation dataset and calculates the metrics you can use to tweak your pipeline.
Running experiments is a formal way to evaluate your model and see how often it predicts the correct answer.
RAG Pipelines
For RAG pipelines, you can run an experiment to get the groundedness and no answer scores. To do this, you only need queries in your evaluation dataset. At the time of the experiment, deepset Cloud runs the queries through the RAG pipeline and based on the answer the pipeline generates, it calculates:
- How well grounded in the documents the answers are (groundedness score)
- How many queries resulted in no answer (no answer score)
Overview of Pipeline Evaluation
Evaluating a pipeline involves a couple of steps. This image shows you an overview of the whole process:
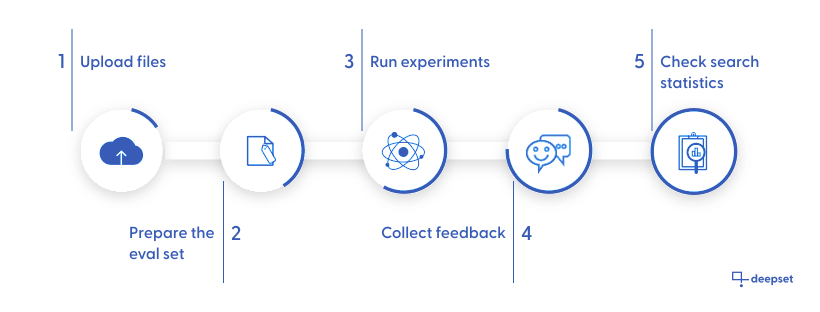
- First, make sure you upload files to your workspace. The pipeline you're evaluating will run on these files. The more files, the more difficult the task of finding the right answer is.
Coming soon!
Currently, the evaluation runs on all the files in your workspace but we're working on making it possible to choose a subset of files for an experiment.
- The evaluation dataset contains the annotated data used to estimate your model skills. You can choose one dataset per evaluation run. You can use the Labeling Projects to prepare evaluated datasets for document search.
See also Evaluation Datasets. - An experiment is the part where you check how your pipeline is performing. When an experiment finishes, you can review its details on the Experiment Details page, where you can check:
- The experiment status. If the experiment failed, check the Debug section to see what went wrong.
- The details of the experiment: the pipeline and the evaluation set used.
- Metrics for pipeline components. You can see both metrics for integrated and isolated evaluation. For more information about metrics, see Evaluation Metrics.
- The pipeline parameters and configuration used for this experiment. It may be different from the actual pipeline as you can update your pipeline just for an experiment run, without modifying the actual pipeline.
You can't edit your pipeline in this view. - Detailed predictions. Here you can see how your pipeline did and what answers it returned (predicted answer) compared to the expected answers. The predictions are shown for each node separately.
You can export these data into a CSV file. Open the node whose predictions you want to export and click Download CSV.
If you're unhappy with your pipeline performance during the experiment, check Optimizing Your Pipeline for better results.
- Demo your pipeline to others. Invite people to your organization, let them test your search, and collect their feedback. Everyone listed on the Organization page can run a search with your pipelines. Have a look at Guidelines for Onboarding Your Users to ensure you set the right expectations for your pipeline performance.
The users can give each answer a thumbs-up or thumbs-down evaluation. You can then export this feedback to a CSV file and analyze it. - Reviewing search statistics is another way to check how your pipeline is doing. You can find all the data on the Dashboard in the LATEST REQUESTS section. Here you can check:
- The actual query.
- The answer with the highest score.
- The pipeline used for the search.
- The top file, which for a QA pipeline is the file that contains the top answer, and for a document retrieval pipeline, is the file with the highest score.
- Who ran the search.
- How many seconds it took to find the answer.
Updated 6 months ago