Create a Pipeline in Pipeline Builder
Use an intuitive, low code, drag-and-drop interface to build your pipelines. Easily switch between visual and code representations.
About Builder
Builder is an easy way to build and visualize your pipelines. In Builder, you simply drag components from the components library and drop them onto a canvas, where you can customize their parameters and define connections. It helps you visualize your pipeline and offers guidance on component compatibility. You can also switch to the YAML view anytime; everything you do in Builder is synchronized with the pipeline YAML configuration.
Using Builder
This image shows how to access the basic functionalities in Builder. The numbers in the list below correspond to the numbers in the image.
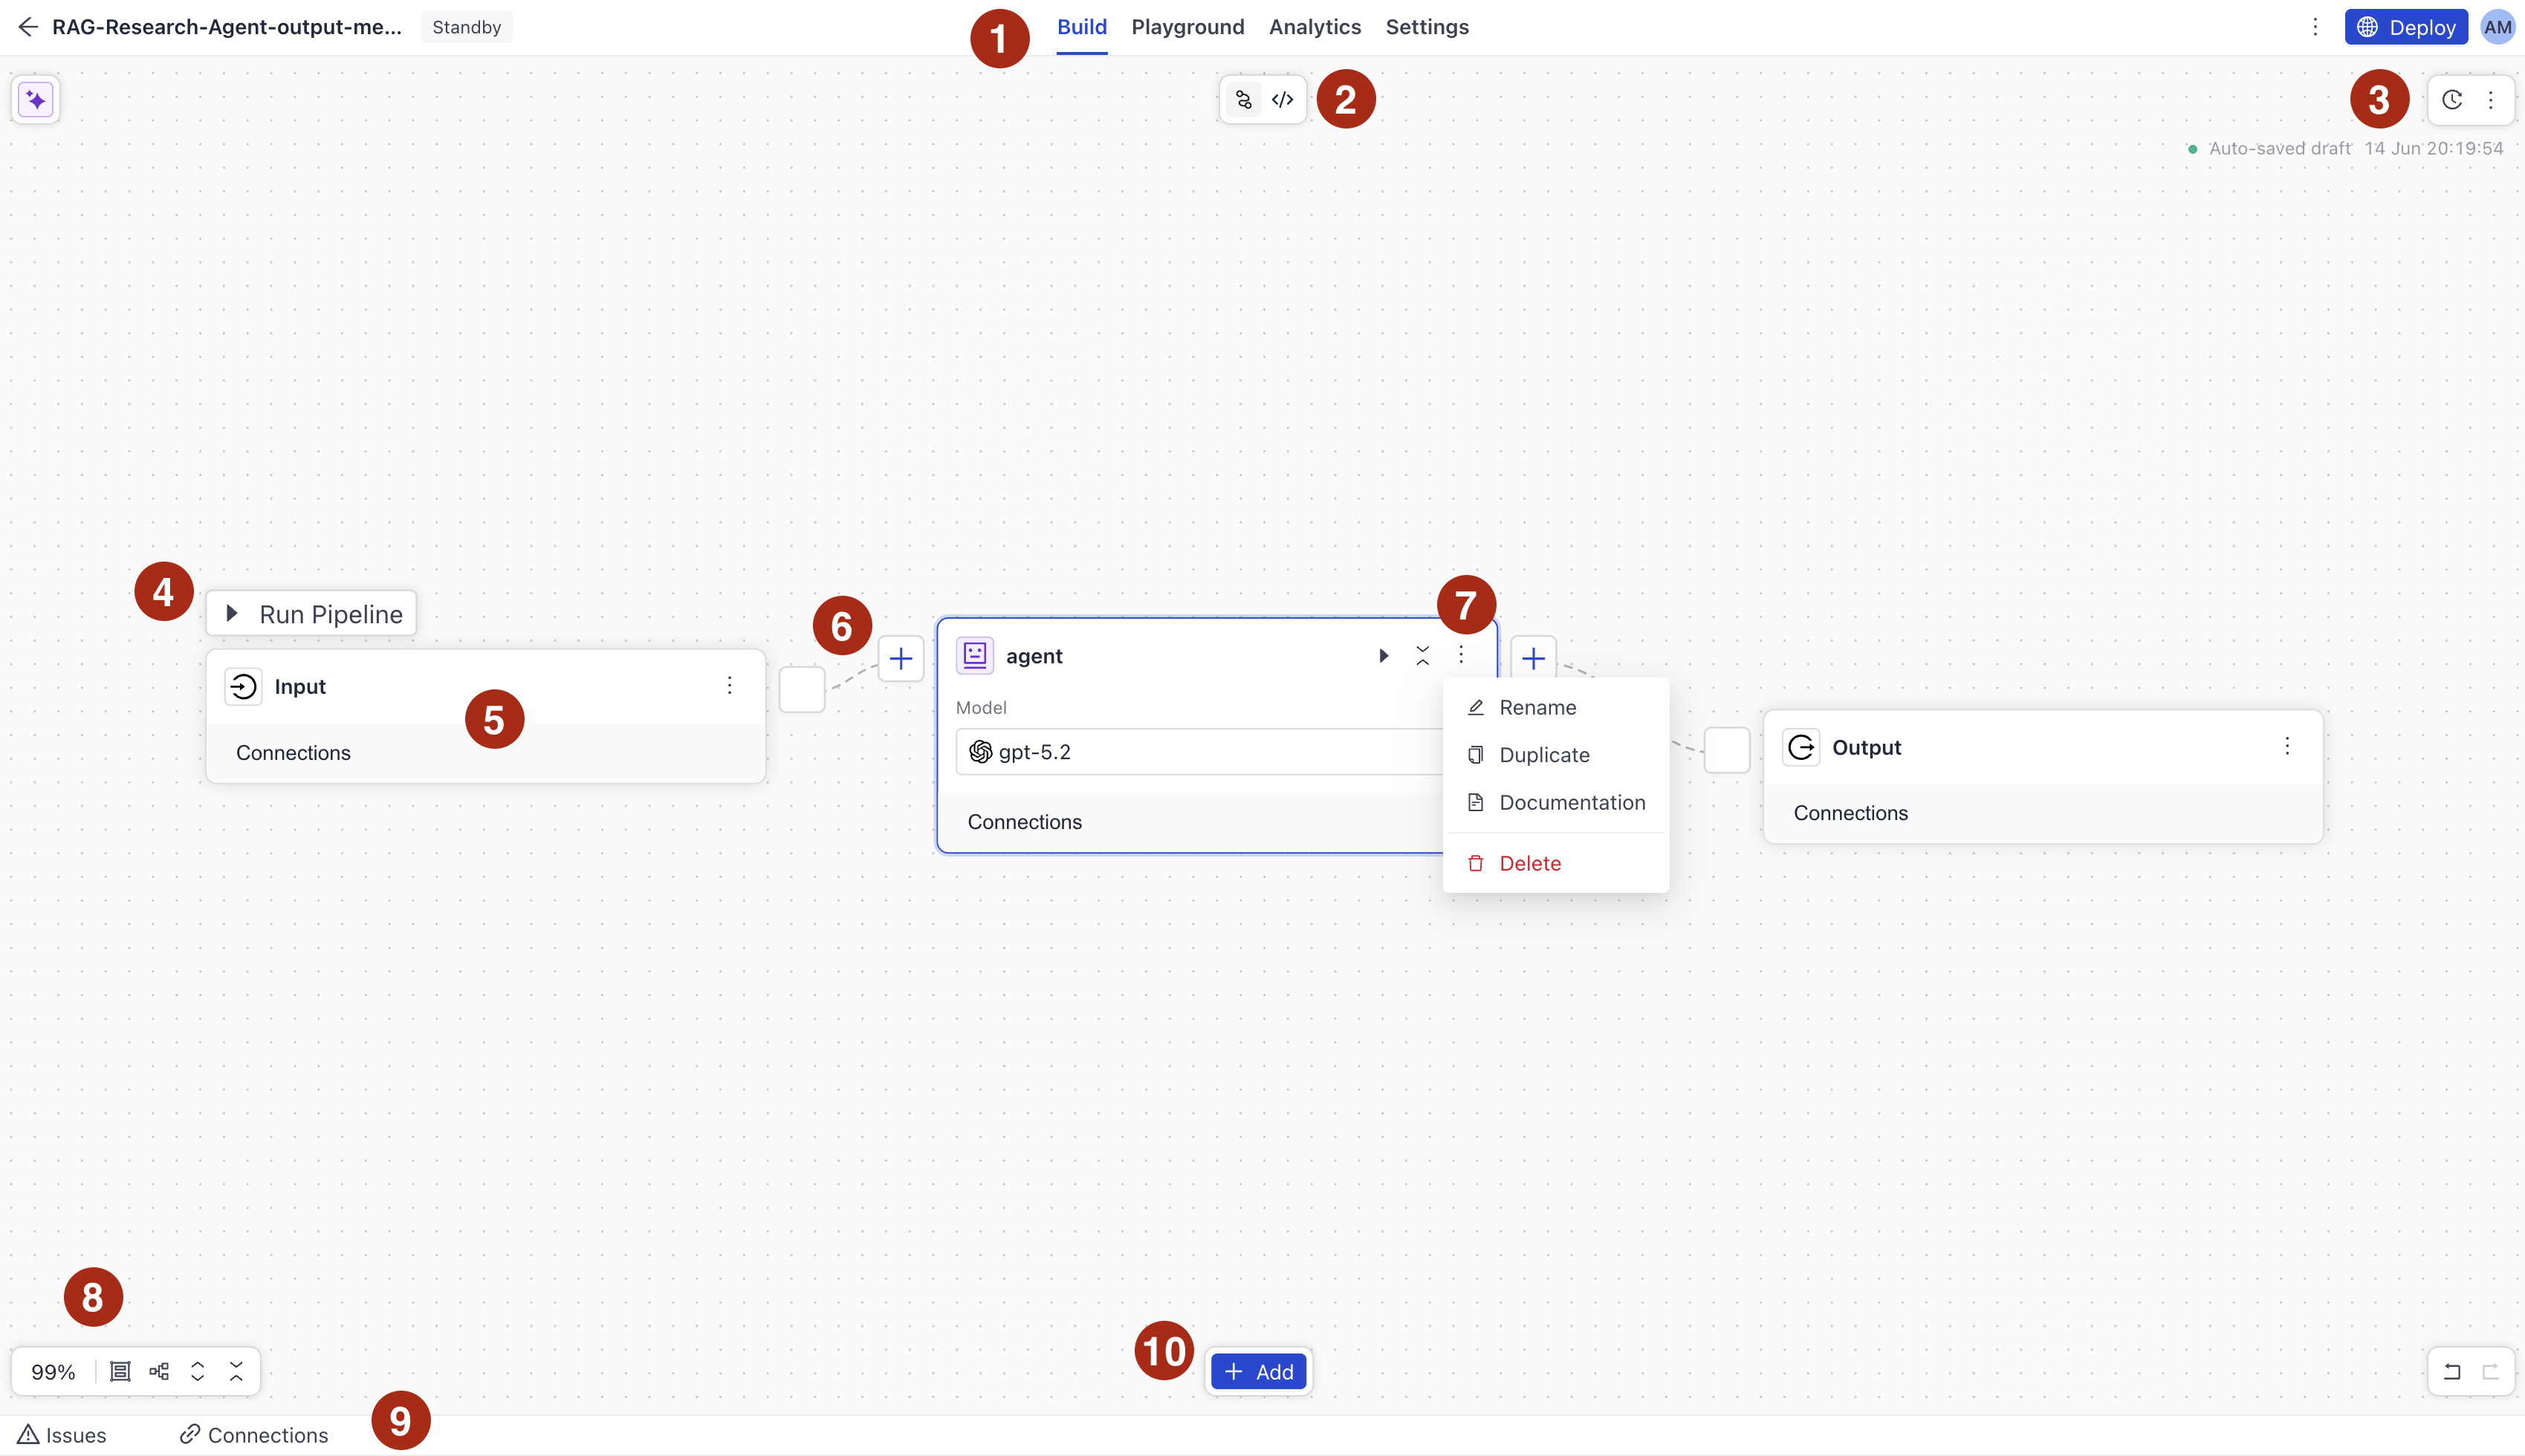
- Switch between Builder, Playground (where you can test your pipeline), pipeline analytics (where you can see pipeline details, including search history and logs), and settings (where you can expose your pipeline as an MCP tool, enable GPU or scaling, and more).
- Switch between YAML editor and visual canvas.
- Manage pipeline versions and enable autosave.
- Run the pipeline right in the Builder without needing to deploy it.
- A component card. Click the component to open its configuration. Hover over the component icon to check its type and location.
- Component connections. Drag a line between components to connect them or use the Connections panel. You can also use the Command Palette to create connections. Press CMD + K to open it and type
connectto see the available commands. - Run and More Actions. Click the Run button to run the component in isolation and the More Actions button to access the component's menu.
- Use this menu to:
- Zoom in and out of the canvas.
- Group components. You can collapse and expand groups to reduce visual clutter. Groups are saved with your pipeline and restored when you reload the builder.
- Return to the default positioning of components.
- Expand or collapse components.
- Issues and Connections. Expand the view to see all validation and runtime issues in one place. Click Inspect next to an issue to jump directly to the affected component or connection and fix it. Click Fix with AI to open the AI assistant, which reasons through the fix and can apply it for you. Expand the Connections view to manage, inspect, and edit component connections.
- Add components. Expand a component group and drag a selected component onto the canvas to add it to your pipeline. You can also use the search bar to find components. The search bar includes an AI-powered semantic search, so you can search for components by their name or functionality. By default, the component library hides legacy components. To show them, click More Actions next to the search field and choose Show deprecated components. You can also pin the component library to keep it always visible.
- AI Assistant. Click AI Assistant to open a chat panel where you can ask questions about your pipeline, get help debugging issues, or explore other use cases. The assistant runs on an underlying Haystack pipeline and streams responses directly in Builder.
Running Components and Pipelines
You can run single components to understand their inputs and outputs and check if they work correctly before you save and deploy the whole pipeline. Click Run on a component card.
You can also run the whole pipeline without needing to deploy it first. Just click the Run Pipeline button on the canvas.
Considerations for Building Pipelines
There are a couple of things you should know when building in Builder:
- Pipeline start: Your pipeline must start with an input component. Pipelines always take
Inputas the first component. - Pipeline end: Pipelines end with the
Outputcomponent connected to a component that passes answers and often also documents to it. - Complex parameters: Some components take parameters that are not Python primitives. These parameters are configured as YAML.
For example,PromptBuilder'stemplateorConditionalRouter'sroutesuse Jinja2 templates. These parameters configurations can affect the component's inputs and outputs, depending on the variables you add to the template. For instance, if you addQueryandDocumentsas variables in the PromptBuilder'stemplate, they'll be listed as required inputs. Otherwise, they won't be.
For configuration examples, check the component's documentation in the Pipeline Components section.
Get Help from the AI Assistant
Builder includes a persistent AI Assistant that you can open from anywhere, including the Build, Playground, Analytics, and Settings tabs.
To open the AI Assistant, do one of the following:
- Click the AI Assistant icon in the Pipeline Studio header.
- Press Cmd+J (macOS) or Ctrl+J (Windows/Linux) to toggle the panel open or closed.
Use the assistant to help you build, solve problems, or do tasks in the platform.
Running Components and Pipelines
You can run single components to understand their inputs and outputs and check if they work correctly before you save and deploy the whole pipeline. For information on how it works, see Run Components and Pipelines in Builder.
You can also run the whole pipeline without needing to deploy it first. Just click the Run button on the navigation bar.
Understanding the Pipeline YAML Format
Expand to view the YAML explanation
Every pipeline is backed by a YAML configuration. You can access and edit it directly by switching to the YAML editor in Builder. Any changes you make in the visual editor are reflected in the YAML, and the other way around.
A pipeline YAML has four main sections:
components: Defines the components in your pipeline and their parameters.connections: Defines how components pass data to each other.inputs: Maps pipeline-level inputs to the inputs of specific components.outputs: Maps component outputs to the pipeline's final output.
Components
Each entry under components defines a component by its name and type. The name is optional and is a label you choose; you reference it in connections, inputs, and outputs. The type is the fully qualified class path of the component, which you can find on the component's documentation page.
You can drag a component from the Component Library onto the visual canvas and then switch to the YAML editor to see the component's definition.
Use init_parameters to configure the component. Nested components, such as document stores, are also defined inline here:
components:
  query_embedder:
    type: deepset_cloud_custom_nodes.embedders.nvidia.text_embedder.DeepsetNvidiaTextEmbedder
    init_parameters:
      normalize_embeddings: true
      model: intfloat/e5-base-v2

  embedding_retriever:
    type: haystack_integrations.components.retrievers.opensearch.embedding_retriever.OpenSearchEmbeddingRetriever
    init_parameters:
      document_store:
        type: haystack_integrations.document_stores.opensearch.document_store.OpenSearchDocumentStore
        init_parameters:
          embedding_dim: 768
      top_k: 20
Connections
The connections section defines how data flows between components. Each connection specifies a sender and a receiver in the format component_name.output_name and component_name.input_name:
connections:
- sender: query_embedder.embedding
  receiver: embedding_retriever.query_embedding
- sender: embedding_retriever.documents
  receiver: ranker.documents
Inputs
The inputs section maps pipeline-level inputs to the inputs of specific components. Each key is a pipeline input name (for example, query or filters). The list under each key specifies which component inputs receive that value:
inputs:
  query:
  - "query_embedder.text"
  - "ranker.query"
  filters:
  - "embedding_retriever.filters"
Outputs
The outputs section maps the pipeline's named outputs to specific component outputs. Each key is the name of a pipeline output, and the value is a component_name.output_name reference:
outputs:
  documents: "ranker.documents"
Example: Semantic Document Search Pipeline
Here's a complete query pipeline that embeds the query, retrieves semantically similar documents, and re-ranks the results:
components:
  query_embedder:
    type: deepset_cloud_custom_nodes.embedders.nvidia.text_embedder.DeepsetNvidiaTextEmbedder
    init_parameters:
      normalize_embeddings: true
      model: intfloat/e5-base-v2

  embedding_retriever:
    type: haystack_integrations.components.retrievers.opensearch.embedding_retriever.OpenSearchEmbeddingRetriever
    init_parameters:
      document_store:
        type: haystack_integrations.document_stores.opensearch.document_store.OpenSearchDocumentStore
        init_parameters:
          embedding_dim: 768
      top_k: 20

  ranker:
    type: deepset_cloud_custom_nodes.rankers.nvidia.ranker.DeepsetNvidiaRanker
    init_parameters:
      model: tomaarsen/Qwen3-Reranker-0.6B-seq-cls
      top_k: 20

connections:
- sender: query_embedder.embedding
  receiver: embedding_retriever.query_embedding
- sender: embedding_retriever.documents
  receiver: ranker.documents

inputs:
  query:
  - "query_embedder.text"
  - "ranker.query"
  filters:
  - "embedding_retriever.filters"

outputs:
  documents: "ranker.documents"
This pipeline works as follows:
query_embedderconverts the query into a vector embedding.embedding_retrieveruses that embedding to find the most semantically similar documents in the document store.rankerre-ranks the retrieved documents by relevance.- The pipeline returns the re-ranked documents as its output.
Prerequisites
- To learn about how pipelines and components work, see Pipeline Components and Pipelines.
- To use a hosted model, connect to model providers first so that you don't have to pass the API key within the pipeline. For Hugging Face, this is only required for private models. Once Haystack Enterprise Platform is connected to a model provider, just pass the model name in the
modelparameter of the component that uses it in the pipeline. Haystack Enterprise Platform will download and load the model. For more information, see Language Models in Haystack Enterprise Platform. - To reuse custom model definitions when you configure components in Pipeline Builder, make sure they're added on the Integrations page in Settings. For details, see Add Custom Model Definitions.
Create a Pipeline From a Template
-
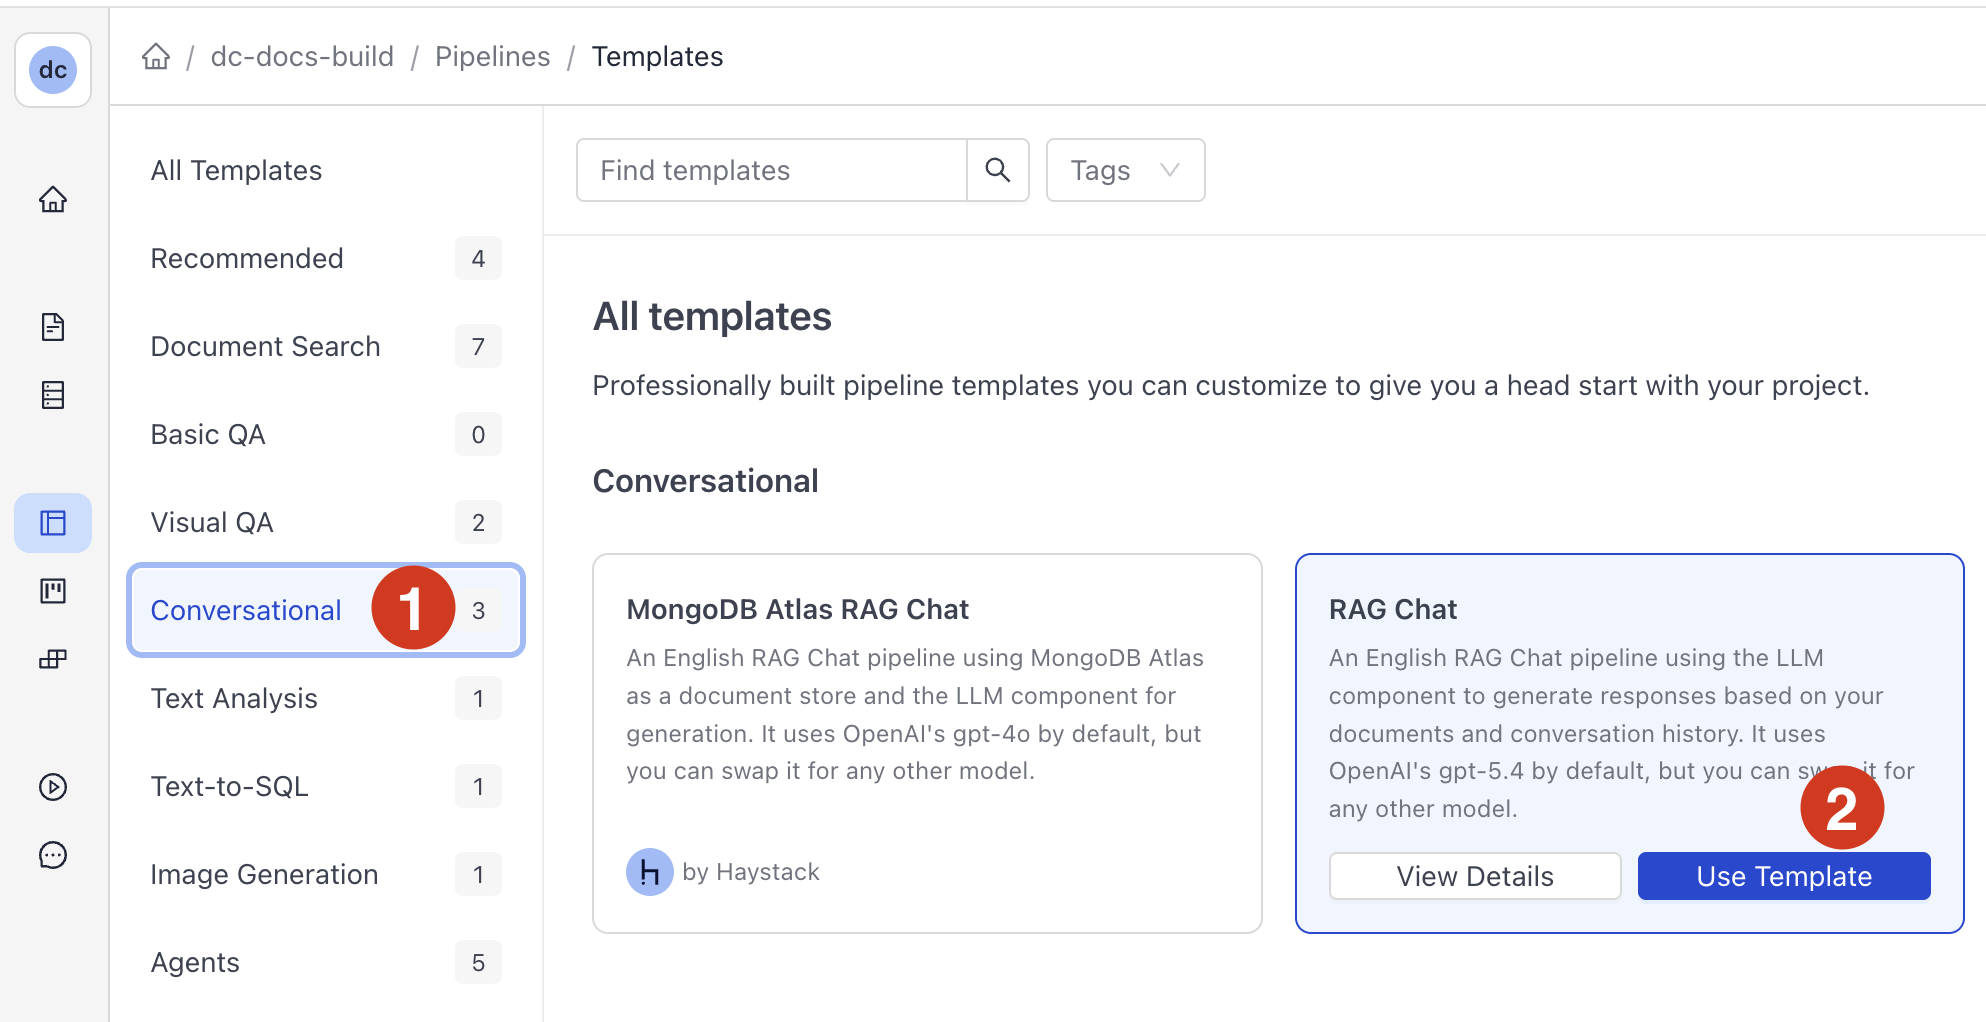
Log in to Haystack Enterprise Platform and go to Pipeline Templates.
There are templates available for various tasks. They work out of the box or you can use them as a starting point for your pipeline. -
Find a template that best matches your use case, hover over it, and click Use Template.
-
Give your pipeline a name and click Create Pipeline. You're redirected to Builder, where you can view and edit your pipeline. Make sure you choose an index for your pipeline on the document store card.
-
Depending on what you want to do:
- To test your pipeline, deploy it first. Click Deploy in the upper right corner, wait until it's deployed, and then test your pipeline in Playground. You can also try it out directly in Builder by clicking Run Pipeline above the
Inputcomponent. - To edit your pipeline, see Step 5 in Create a pipeline from an empty file.
- To test your pipeline, deploy it first. Click Deploy in the upper right corner, wait until it's deployed, and then test your pipeline in Playground. You can also try it out directly in Builder by clicking Run Pipeline above the
Create a Pipeline From an Empty File
- Log in to Haystack Enterprise Platform and go to Pipeline Templates.
- In the top right corner, click Create empty pipeline.
- Give your pipeline a name and click Create Pipeline.
You're redirected to Builder. - Add the inputs for your pipeline. Pipelines must start with the
Inputcomponent. - Click Add to add components from the components library and define their connections.
- To give your pipeline access to files from a Haystack Platform workspace, add
Retrieverswith a matchingDocument Store. For example, to useOpenSearchDocumentStore, addOpenSearchEmbeddingRetrieverorOpenSearchBM25Retrieverto your pipeline and connect them to theOpenSearchDocumentStore. Choose the index for the document store. - Add the
Outputcomponent as the last component in your pipeline and connect it to the component generating answers (in LLM-based pipelines, this isDeepsetAnswerBuilder). Optionally, connect the documents output to it if you want them included in the pipeline's output. - Save your pipeline.
What To Do Next
- To share and test your pipeline, deploy it. Click Deploy in the top right corner of Builder.
- To test your pipeline, wait until it's indexed and then go to Playground. Make sure your pipeline is selected, and type your query.
- To view pipeline details, such as statistics, feedback, or logs, click the pipeline name and switch to Analytics.
- To let others test your pipeline, share your pipeline prototype.
- If your pipeline contains components that work better on a GPU, turn on GPU acceleration. For details, see Enable GPU Acceleration.
Was this page helpful?