Create a Pipeline
Create a pipeline from scratch or choose one of the available templates for an easy start. You can use the code editor or REST API.
Pipeline VersionsCurrently, you can create both v1.0 and v2.0 pipelines. Each pipeline has a version tag next to it on the pipelines page.
Creating v2.0 pipelines is possible with Pipeline Editor or REST API. Guided workflow creates v1.0 pipelines.
When creating a pipeline with Pipeline Templates, you can choose the pipeline version.
About This Task
This document explains how to create v2.0 pipelines. For instructions on creating v1.0 pipelines, see Create a v1.0 pipeline.
When creating a pipeline, you can see two tabs in the Editor:
- Indexing pipeline: Defines how your files are preprocessed. Whenever you add a file, it is preprocessed by all deployed pipelines.
- Query pipeline: Describes how the query is resolved.

There are two ways to create a pipeline:
- Using Pipeline Editor: Choose this method to create your own pipeline from one of the ready-made templates or from scratch using the YAML code editor.
- Using API: Choose this way if you already have a pipeline YAML file and want to programmatically upload it to deepset Cloud.
Prerequisites
- To learn about how pipelines and nodes work in deepset Cloud, see Pipeline Components and Pipelines.
- To use a hosted model, Connect to Model Providers first so that you don't have to pass the API key within the pipeline. For Hugging Face, this is only required for private models. Once deepset Cloud is connected to a model provider, just pass the model name in the
model_name_or_pathparameter of the node that uses it in the pipeline. deepset Cloud will download and load the model. For more information, see Language Models in deepset Cloud.
Create a Pipeline Using Pipeline Editor
If you already know what your pipeline should look like or want to use one of the ready-made templates, that's the method for you. It's recommended that you have a basic understanding of YAML as that's the programming language in which you create pipelines.
Pipeline Format
Your pipeline definition file is in the YAML format. Make sure that you follow the same indentation structure as in this example. Check the Indexing Pipeline and the Query Pipeline format in the tabs:
components: # This section defines your pipeline components and their settings
  component_1: # Give your component a friendly name, you'll use it in the connections section
    type: # You can find the component type in documentation on a component's page
    init_parameters: # Customize the component's settings. To use default values, skip this.

  component_2:
    type:
    init_parameters:
      parameter1: value
      parameter2: value2

# Continue until you define all components

connections:  # Define how the components are connected
              # You must explicitly indicate the intpus and outputs you want to connect
              # Input and output types must be the same to be connected
              # You can check components outputs and inputs in documentation
- sender: component_1.output_name # Here you define the output name this component sends to the receiver component
  receiver: component_2.input_name # Here you define the input name that receives the output of the sender component

inputs:  # List all components that need query and filters as inputs but aren't getting them from any other component connected to them
  query:  # These components will receive the query as input
  - "component_1.question"
  filters:  # These components will receive a potential query filter as input
  - "component_1.filters"
components: # This section defines your pipeline components and their settings
  component_1: # Give your component a friendly name, you'll use it in the sections below
    type: # You can find the component type in documentation on a component's page (here maybe a link to components' docs)
    init_parameters: # Customize the component's settings, to use default values, skip this

  component_2:
    type:
    init_parameters:
      parameter1: value1
      parameter2: value2

connections:  # Define how the components are connected
              # You must explicitly indicate the intpus and outputs you want to connect
              # Input and output types must be the same to be connected
              # You can check components outputs and inputs in documentation
- sender: component_1.output_name # Here you define the output name this component sends to the receiver component
  receiver: component_2.input_name # Here you define the input name that receives the output of the sender component

inputs:  # List all components that need query and filters as inputs but aren't getting them from any other component connected to them
  query:  # These components will receive the query as input
  - "component_1.question"
  filters:  # These components will receive a potential query filter as input
  - "component_1.filters"
outputs:  # Defines the output of your pipeline, usually the output of the last component
  documents: "component_2.documents"  # The output of the pipeline is the retrieved documents
Create a Pipeline
-
Log in to deepset Cloud and go to Pipelines.
-
Click Create Pipeline and choose if you want to create a pipeline from an empty file or use a template.
There are pipeline templates available for different types of tasks. All of them work out of the box, but you can also use them as a starting point for your pipeline.-
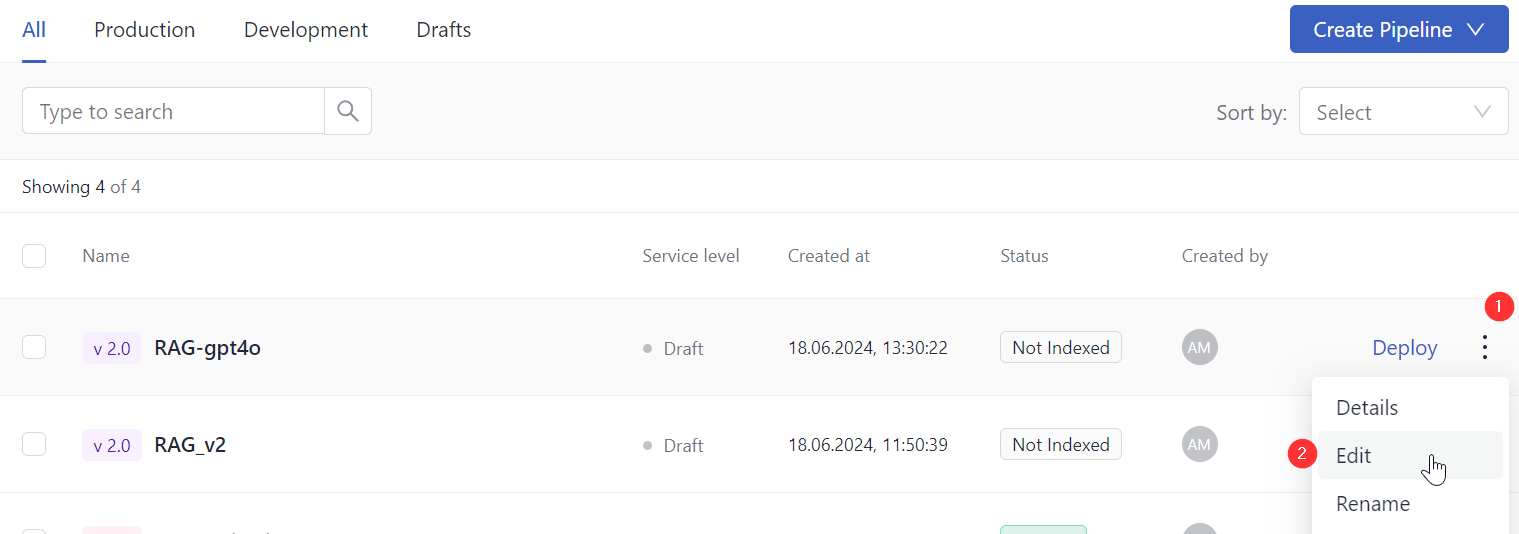
If you chose an empty file, give your pipeline a name, choose the pipeline version, and click Create Pipeline. You're redirected to the Pipelines page. You can find your pipeline in the All tab. To edit the pipeline, click the More Actions menu next to it and choose Edit.

-
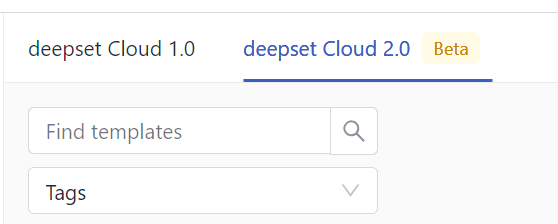
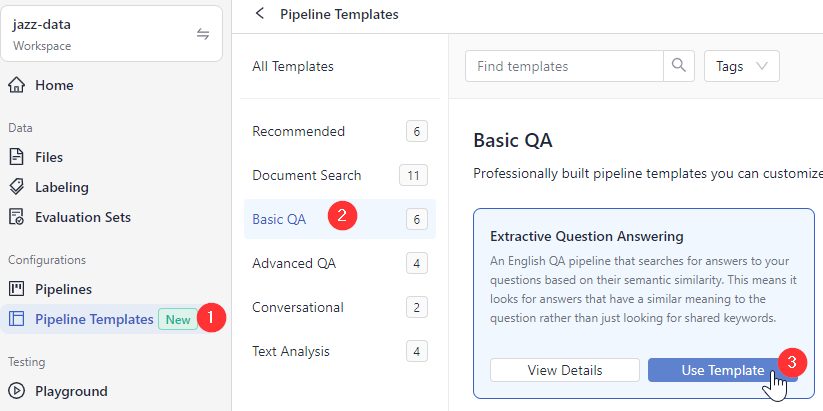
If you choose a template, you're redirected to the Pipeline Templates page. You can switch between templates for v1.0 and v2.0:

-
Choose a template that best matches your use case, hover over it, and click Use Template.

-
Give your pipeline a name and click Create Pipeline. You land on the Pipelines page. Your pipeline is a draft, which you can find in the Drafts tab. You can now modify the pipeline or use it as it is.
-
Depending on what you want to do:
- To modify the template, click the More Actions menu next to your pipeline and choose Edit. You're redirected to the Editor, where you can edit and save your pipeline. Follow the instructions in step 3 below.
- To use the template as is, go directly to Step 4 below.
-
-
-
(Optional) To modify the template in Editor:
- In the Indexing Pipeline tab, in the
componentssection, configure all the components you want to use for preprocessing your files. For each component, you must specify:- Name: You give the component a custom name and use it throughout the YAML file.
- Type: Each component has a type. You can check it on the component's documentation page. See also Pipeline Components.
- Init_parameters: These are the component's settings. It lists the parameters for the component and their values. If you don't configure any parameters, the component uses its default settings for the mandatory parameters.
Here's an example of what a configured component:components: joiner: type: haystack.components.joiners.document_joiner.DocumentJoiner init_parameters: join_mode: concatenate sort_by_score: false
- Add a
connectionssection and define how the components are connected. You connect one component's output to the next one's input, as in the following example. Input and output must be of the same type to be connected.connections: - sender: component1.output_name receiver: component2.input name - List the components that should receive query and filters from the pipeline as input. These are usually the components that require query or filters as input but didn't receive it from any other component in the pipeline:
inputs: query: # here you lis the components that should receive the query - "component1.input_name" filters: # here you list components that will receive potential query filters as input - "component2.input_name" - Define the pipeline output. You must explicitly list components and their output names, which should be the outcome of the pipeline. For example, you may want the output to be a generated answer and documents, as in this example:
outputs:
  documents: "ranker.documents"
  answers: "answer_builder.answers"
- In the Indexing Pipeline tab, in the
-
To use your pipeline, you must first deploy it. Click Deploy next to the pipeline on the Pipelines page or in the top right corner of the Designer. This triggers indexing.
-
To test your pipeline, wait until it's indexed and then go to Playground. Make sure your pipeline is selected, and type your query.
An example of a pipeline
components:
  file_classifier:
    type: haystack.components.routers.file_type_router.FileTypeRouter
    init_parameters:
      mime_types:
      - text/plain
      - application/pdf
      - text/markdown
      - text/html

  text_converter:
    type: haystack.components.converters.txt.TextFileToDocument
    init_parameters:
      encoding: utf-8

  pdf_converter:
    type: haystack.components.converters.pypdf.PyPDFToDocument
    init_parameters:
      converter_name: default

  markdown_converter:
    type: haystack.components.converters.markdown.MarkdownToDocument
    init_parameters:
      table_to_single_line: false

  html_converter:
    type: haystack.components.converters.html.HTMLToDocument
    init_parameters:
      # A dictionary of keyword arguments to customize how you want to extract content from your HTML files.
      # For the full list of available arguments, see
      # the [Trafilatura documentation](https://trafilatura.readthedocs.io/en/latest/corefunctions.html#extract).
      extraction_kwargs:
        output_format: txt  # Extract text from HTML. You can also also choose "markdown"
        target_language: null  # You can define a language (using the ISO 639-1 format) to discard documents that don't match that language.
        include_tables: true  # If true, includes tables in the output
        include_links: false  # If true, keeps links along with their targets

  joiner:
    type: haystack.components.joiners.document_joiner.DocumentJoiner
    init_parameters:
      join_mode: concatenate
      sort_by_score: false

  splitter:
    type: haystack.components.preprocessors.document_splitter.DocumentSplitter
    init_parameters:
      split_by: word
      split_length: 250
      split_overlap: 30

  document_embedder:
    type: haystack.components.embedders.sentence_transformers_document_embedder.SentenceTransformersDocumentEmbedder
    init_parameters:
      model: "intfloat/e5-base-v2"
      device: null

  writer:
    type: haystack.components.writers.document_writer.DocumentWriter
    init_parameters:
      document_store:
        type: haystack_integrations.document_stores.opensearch.document_store.OpenSearchDocumentStore
        init_parameters:
          embedding_dim: 768
          similarity: cosine
      policy: OVERWRITE

connections:  # Defines how the components are connected
- sender: file_classifier.text/plain
  receiver: text_converter.sources
- sender: file_classifier.application/pdf
  receiver: pdf_converter.sources
- sender: file_classifier.text/markdown
  receiver: markdown_converter.sources
- sender: file_classifier.text/html
  receiver: html_converter.sources
- sender: text_converter.documents
  receiver: joiner.documents
- sender: pdf_converter.documents
  receiver: joiner.documents
- sender: markdown_converter.documents
  receiver: joiner.documents
- sender: html_converter.documents
  receiver: joiner.documents
- sender: joiner.documents
  receiver: splitter.documents
- sender: splitter.documents
  receiver: document_embedder.documents
- sender: document_embedder.documents
  receiver: writer.documents

max_loops_allowed: 100

inputs:  # Define the inputs for your pipeline
  files: "file_classifier.sources"  # This component will receive the files to index as input
components:
chat_summary_prompt_builder:
type: haystack.components.builders.prompt_builder.PromptBuilder
init_parameters:
template: |-
Rewrite the current question so that it is suitable for web search ONLY if chat history is provided.
If the chat history is empty, DO NOT reformulate the question.
Be cautious when reformulating the current question. Substantial changes to the current question that distort the meaning of the current question are undesirable.
It is possible that the current question does not need any changes.
The chat history can help to incorporate context into the reformulated question.
Make sure to incorporate that chat history into the reformulated question ONLY if needed.
The overall meaning of the reformulated question must remain the same as the current question.
You cannot change or dismiss keywords in the current question.
If you do not want to make changes, just output the current question.
Chat History: {{question}}
Reformulated Question:
chat_summary_llm:
type: haystack.components.generators.openai.OpenAIGenerator
init_parameters:
api_key: {"type": "env_var", "env_vars": ["OPENAI_API_KEY"], "strict": False}
model: "gpt-3.5-turbo"
generation_kwargs:
max_tokens: 650
temperature: 0.0
seed: 0
replies_to_query:
type: haystack.components.converters.output_adapter.OutputAdapter
init_parameters:
template: "{{ replies[0] }}"
output_type: str
bm25_retriever: # Selects the most similar documents from the document store
type: haystack_integrations.components.retrievers.opensearch.bm25_retriever.OpenSearchBM25Retriever
init_parameters:
document_store:
init_parameters:
use_ssl: True
verify_certs: False
hosts:
- ${OPENSEARCH_HOST}
http_auth:
- "${OPENSEARCH_USER}"
- "${OPENSEARCH_PASSWORD}"
type: haystack_integrations.document_stores.opensearch.document_store.OpenSearchDocumentStore
top_k: 20 # The number of results to return
query_embedder:
type: haystack.components.embedders.sentence_transformers_text_embedder.SentenceTransformersTextEmbedder
init_parameters:
model: "intfloat/e5-base-v2"
device: null
embedding_retriever: # Selects the most similar documents from the document store
type: haystack_integrations.components.retrievers.opensearch.embedding_retriever.OpenSearchEmbeddingRetriever
init_parameters:
document_store:
init_parameters:
use_ssl: True
verify_certs: False
http_auth:
- "${OPENSEARCH_USER}"
- "${OPENSEARCH_PASSWORD}"
type: haystack_integrations.document_stores.opensearch.document_store.OpenSearchDocumentStore
top_k: 20 # The number of results to return
document_joiner:
type: haystack.components.joiners.document_joiner.DocumentJoiner
init_parameters:
join_mode: concatenate
ranker:
type: haystack.components.rankers.transformers_similarity.TransformersSimilarityRanker
init_parameters:
model: "intfloat/simlm-msmarco-reranker"
top_k: 8
device: null
model_kwargs:
torch_dtype: "torch.float16"
qa_prompt_builder:
type: haystack.components.builders.prompt_builder.PromptBuilder
init_parameters:
template: |-
You are a technical expert.
You answer questions truthfully based on provided documents.
For each document check whether it is related to the question.
Only use documents that are related to the question to answer it.
Ignore documents that are not related to the question.
If the answer exists in several documents, summarize them.
Only answer based on the documents provided. Don't make things up.
If the documents can't answer the question or you are unsure say: 'The answer can't be found in the text'.
These are the documents:
{% for document in documents %}
Document[{{ loop.index }}]:
{{ document.content }}
{% endfor %}
Question: {{question}}
Answer:
qa_llm:
type: haystack.components.generators.openai.OpenAIGenerator
init_parameters:
api_key: {"type": "env_var", "env_vars": ["OPENAI_API_KEY"], "strict": False}
model: "gpt-3.5-turbo"
generation_kwargs:
max_tokens: 400
temperature: 0.0
seed: 0
answer_builder:
init_parameters: {}
type: haystack.components.builders.answer_builder.AnswerBuilder
connections: # Defines how the components are connected
- sender: chat_summary_prompt_builder.prompt
receiver: chat_summary_llm.prompt
- sender: chat_summary_llm.replies
receiver: replies_to_query.replies
- sender: replies_to_query.output
receiver: bm25_retriever.query
- sender: replies_to_query.output
receiver: query_embedder.text
- sender: replies_to_query.output
receiver: ranker.query
- sender: replies_to_query.output
receiver: qa_prompt_builder.question
- sender: replies_to_query.output
receiver: answer_builder.query
- sender: bm25_retriever.documents
receiver: document_joiner.documents
- sender: query_embedder.embedding
receiver: embedding_retriever.query_embedding
- sender: embedding_retriever.documents
receiver: document_joiner.documents
- sender: document_joiner.documents
receiver: ranker.documents
- sender: ranker.documents
receiver: qa_prompt_builder.documents
- sender: ranker.documents
receiver: answer_builder.documents
- sender: qa_prompt_builder.prompt
receiver: qa_llm.prompt
- sender: qa_llm.replies
receiver: answer_builder.replies
max_loops_allowed: 100
inputs: # Define the inputs for your pipeline
query: # These components will receive the query as input
- "chat_summary_prompt_builder.question"
filters: # These components will receive a potential query filter as input
- "bm25_retriever.filters"
- "embedding_retriever.filters"
outputs: # Defines the output of your pipeline
documents: "ranker.documents" # The output of the pipeline is the retrieved documents
answers: "answer_builder.answers" # The output of the pipeline is the retrieved documents
Create a Pipeline with REST API
This method works well if you have a pipeline YAML ready and want to upload it to deepset Cloud. You need to Generate an API Key first.
Follow the step-by-step code explanation:
📖 Tutorial: Create a Pipeline with API
Or use the following code:
curl --request POST \
     --url https://api.cloud.deepset.ai/api/v1/workspaces/<YOUR_WORKSPACE>/pipelines \
     --header 'Accept: application/json' \
     --header 'Authorization: Bearer <YOUR_API_KEY>'\
     --data-binary "@path/to/pipeline.yaml"
See the REST API endpoint documentation.
What To Do Next
- If you want to use your newly created pipeline for search, you must deploy it.
- To view pipeline details, such as statistics or feedback, click the pipeline name. This opens the Pipeline Details page.
- To let others test your pipeline, share your pipeline prototype.
Updated about 1 month ago