Create a Pipeline in Pipeline Builder
Use an intuitive drag-and-drop interface to build your pipelines. Easily switch between visual and code representations.
About Pipeline Builder
Pipeline Builder is an easy way to build and visualize your pipelines. In Pipeline Builder, you simply drag components from the components library and drop them onto a canvas, where you can customize their parameters and define connections. It helps you visualize your pipeline and offers guidance on component compatibility. You can also switch to the YAML view anytime; everything you do in Pipeline Builder is synchronized with the pipeline YAML configuration.
Using Pipeline Builder
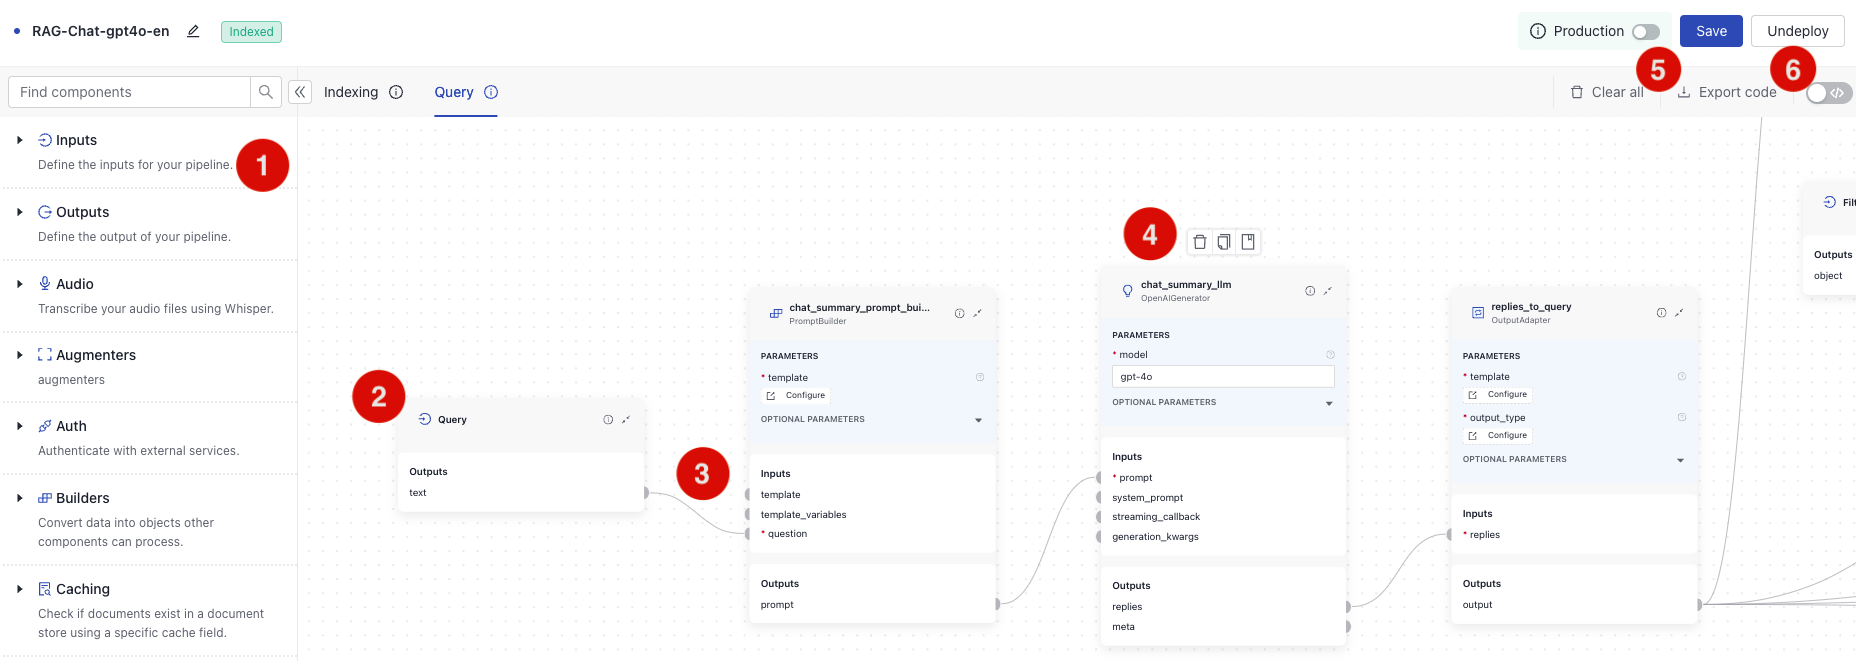
This image shows how to access the basic functionalities in Pipeline Builder. The numbers in the list below correspond to the numbers in the image.
-
Component library. Expand a component group and drag a selected component onto the canvas to add it to your pipeline.
-
A component card. Click the component name to change it.
-
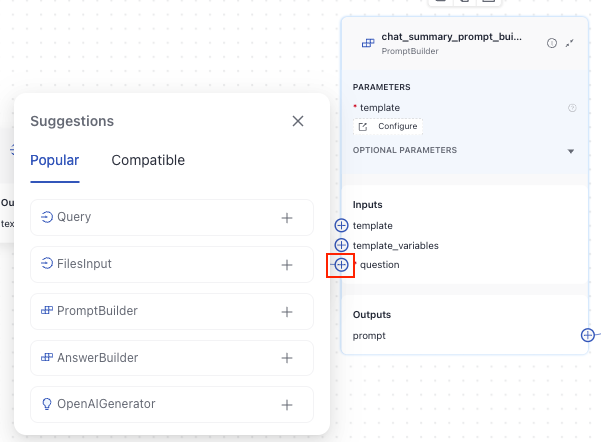
Component connections. Click an input connection on one component and an output connection on another to link them. Hover over a connection point next to an input or output to see a list of popular and compatible components you can connect.
-
Click a component card to access the menu for deleting, duplicating, and accessing the component's documentation.
-
Export your pipeline as a Python or YAML file you can save on your computer.
-
Switch to the YAML view.
Considerations for Building Pipelines
There are a couple of things you should know when building in Pipeline Builder:
- Pipeline start: Your pipeline must start with an input component. Query pipelines always take
Queryand, optionally,Filtersas the first components. - Pipeline end: Query pipelines finish with the
Outputcomponent connected to a component that passes answers and often also documents to it. - Complex parameters: Some components take parameters that are not Python primitives. These parameters are configured as YAML.
For example, PromptBuilder's
templateorConditionalRouter'sroutesuse Jinja2 templates. These parameters configurations can affect the component's inputs and outputs, depending on the variables you add to the template. For instance, if you addQueryandDocumentsas variables in thePromptBuilder'stemplate, they'll be listed as required inputs. Otherwise, they won't be. For configuration examples, check the component's documentation in the Pipeline Components section.
Running Individual Components
You can run single components to understand their inputs and outputs and check if they work correctly before you save and deploy the whole pipeline. For information on how it works, see Run Components in Isolation.
Prerequisites
- To learn about how pipelines and components work in deepset, see Pipeline Components and Pipelines.
- To use a hosted model, Connect to Model Providers first so that you don't have to pass the API key within the pipeline. For Hugging Face, this is only required for private models. Once deepset AI Platform is connected to a model provider, just pass the model name in the
modelparameter of the component that uses it in the pipeline. deepset AI Platform will download and load the model. For more information, see Language Models in deepset.
- If your pipeline will query files from a deepset workspace, create and enable an index. For instructions, see Create an Index. Index prepares your files for search. You can reuse indexes among your query pipelines. To learn about indexes, see Indexes.
Create a Pipeline From an Empty File
- Log in to deepset AI Platform and go to Pipeline Templates.
- In the top right corner, click Create empty pipeline.
- Give your pipeline a name and click Create Pipeline. You're redirected to Pipeline Builder.
- Add the inputs for your pipeline. Query pipelines must start with the
Querycomponent. You can also optionally addFilters. - Add components from the components library and define their connections.
- To give your pipeline access to files from a deepset workspace, add
Retrieverswith a matchingDocument Store. For example, to useOpenSearchDocumentStore, addOpenSearchEmbeddingRetrieverorOpenSearchBM25Retrieverto your pipeline and connect them to theOpenSearchDocumentStore. Choose the index for the document store. - Add the
Outputcomponent as the last component in your pipeline and connect it to the component generating answers (in LLM-based pipelines, this isDeepsetAnswerBuilder). Optionally, connect the documents output to it if you want them included in the pipeline's output. - Save your pipeline.
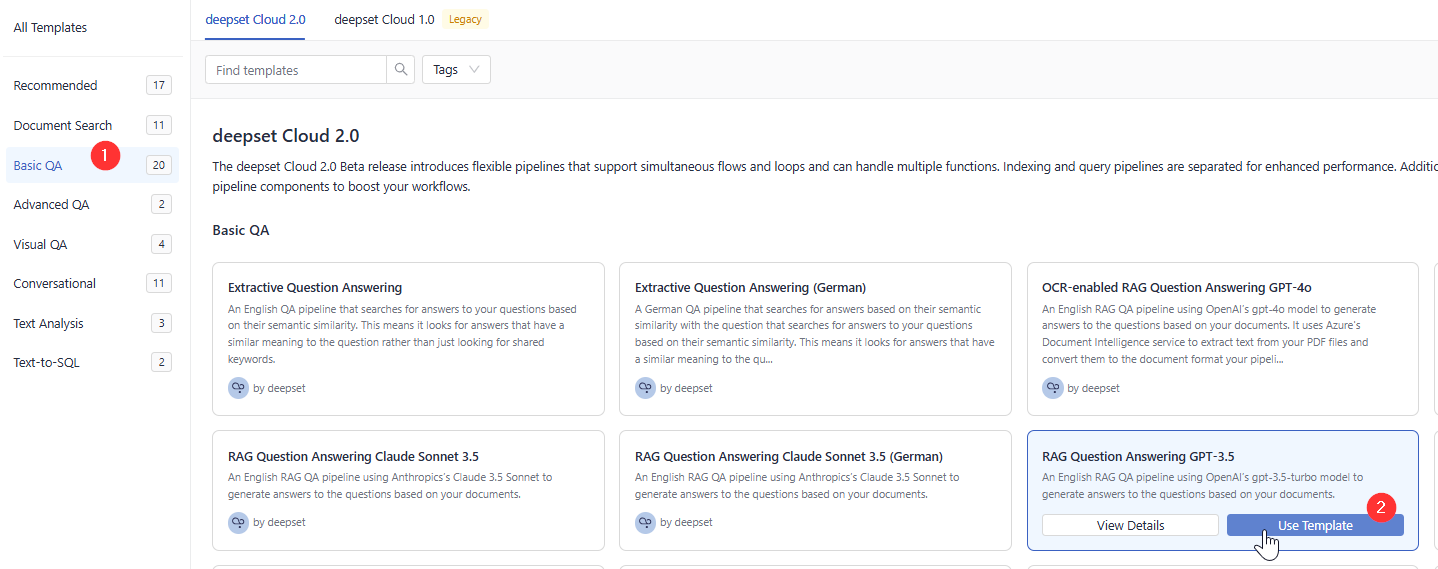
Create a Pipeline From a Template
-
Log in to deepset AI Platform and go to Pipeline Templates. There are templates available for various tasks. They work out of the box or you can use them as a starting point for your pipeline.
-
Find a template that best matches your use case, hover over it, and click Use Template.
-
Give your pipeline a name and click Create Pipeline. You're redirected to Pipeline Builder, where you can view and edit your pipeline. Make sure you choose an index for your pipeline on the
OpenSearchDocumentStorecard. -
Depending on what you want to do:
- To test your pipeline, deploy it first. Click Deploy in the upper right corner, wait until it's deployed, and then test your pipeline in Playground.
- To edit your pipeline, see Step 4 in Create a pipeline from an empty file.
What To Do Next
- To use your pipeline, deploy it. Click Deploy in the top right corner of Pipeline Builder. Every time you deploy a pipeline, it creates a new version you can later view and restore.
- To test your pipeline, wait until it's indexed and then go to Playground. Make sure your pipeline is selected, and type your query.
- To view pipeline details, such as statistics, feedback, or logs, click the pipeline name. This opens the Pipeline Details page.
- To let others test your pipeline, share your pipeline prototype.
Updated 11 days ago